Pleated Embroidered (Smocked) Apron: Mock-Up #1

First, I finally got the fabric I’m going to use for the side-laced cotte dyed!!

Freshly Dyed Fabric

I love the color! I was thinking it would be a bit more blue-ish, but I am pleasantly surprised by the results. I put it next to my white muslin for comparison.

I ended up using Dharma’s fiber reactive procion colors:

One part #30A Emerald Green

One part #32A Electric Blue

And 3/4 part #46 Brilliant Blue

On to the Pleated Apron

My first mock-up of the embroidered pleated apron is done!  It’s a style of aprons that popped up around the mid 14th century and lasted until the late 16th century without changing much in style. I found a couple of new pictures demonstrating the over 200 year range of this accoutrement.

Luttrell Psalter
1320 – 1340 England

Detail from The Seamstress
Edward Schoen 1535

What I like, other than the bling quality, is that it makes the simple apron not so simple and allows it to be worn with fancier garb.

Last time I left off, I was having problems simply getting the dots straight. Here’s what I worked out.

That green thing in the upper right is a home-made Bat-a-rang I made for my son’s birthday party 3 years ago. I still find those things everywhere!

I made a perfect rectangle of a piece of cotton muslin by pulling threads. Here’s a quick and dirty tutorial on it: http://www.sewing.org/files/guidelines/4_204_straightening_fabric_grain.pdf

I squared the edges on my large fabric cutting board and used the marks to make a line nearly across the entire apron every half inch.  Half an inch was too big on one of my previous attempts, but with the method I’m trying, it’s perfect.

Keeping the fabric still lined up on the mat, I marked every 1/2″ in the perpendicular direction. The fabric did slip quite a bit, so generally between each row I would re-straighten it on the mat. It doesn’t matter how many rows you make, but it needs to be an even number (we’ll get to that later).

At this point, I have eight long lines going across, and about 70 dashes going up and down.

Somewhere I read a tip that said do all of the gathering stitches at once. So I threaded 8 needles – I used sharp, medium length embroidery needles. I used normal DMC embroidery floss in a light, but not white color. Avoid the urge to use a completely contrasting color, like red. I did that with the cartridge pleats on my partlet, and when I pulled them out, it left red residue in the holes.

The method I used was I ran along the length-way lines. A smidgen before every dash, I pushed the needle through the fabric. Using the same motions used in a running stitch, right after each dash I came back up.

Tie the back ends of the thread together in batches of 2 and 3. It makes it easier to adjust when gathering the fabric.

When you get to the end of your threads, but still have more line to finish . . .

Start pulling the gathers. That’s why you tied the threads off at the other end and why it’s easier to work all 8 rows at once.

When I finished gathering the gathers, I thought that it looked way too small. I knew that I wanted the apron wider than this.

So I set about spreading the folds and trying my hardest to keep the columns straight. Then I laughed and realized that the smocking will loosen the gathers. I re-pulled the threads together, although not as tight as I did at first.

Take a chop-stick, or something like it, and pock into each pocket created by the gathered threads. It is tedious, but when you are done . . .

all of the rows line up nicely, and . . .

the front looks just lovely.

Now for the smocking. It helps if you understand the pattern first before the stitches.

The Pattern

  • You are working with 2 rows at a time. That’s why you made an even number of rows.
  • I labeled the columns to make it easier to understand.
  • Remember: rows go side to side. Columns go up and down, like columns on a building. It’ll get confusing if I don’t make this distinction.
  • Start at the lower LEFT of the whole damn thing. Believe me, it makes a difference. (Yeah, I tried starting on the right – a big mess)
  • At the bottom left corner, Column A and Column B get stitched together. (Stitch explanations come in a minute).
  • Then go up one row, and Column B and Column C get stitched together.
  • Go back down one row and Column C and Column D get stitches together.
  • Go up one row and Column D and Column E get stitched together.
  • Go back down one row and Column E and Column F get stitched together
  • And so on, and so on, until you finish those 2 rows.
  • Here’s a little visual I threw together:

The Stitches

  • Bring your thread up from the bottom on the leftish to middle part of the top of A. In this case, A is not at the end.
  • Bring your needle around the other side of B and push it through both A and B.
  • Do that one more time. Bring the needle around to the other side of B and go through B and A.
  • Now bring the needle around again, but this time slip the needle into B only. You are going to run the needle up B to the row on top of it. BUT you are doing this under the cloth.
  • Now you are going to do to B and C what you just did to A and B.
  • And then come back down C to the first row.
  • Now repeat with C and D. And then with D and E. And so on.

When you get to the end of the row:

  • Connect the last two together and then tie your thread off underneath.
  • Ignore the thread in the middle, it’s just a loose thread that got into the frame.

Starting a New Row

  • Whatever you do, do NOT, I mean do NOT, just move on up to Row 3 and think you’re going to just work your way back to the left.
  • It does NOT work that way. Yeah, I learned that the hard way too.
  • Go back to the beginning of Row 3 all the way on the left.
  • The pattern for Rows 3 & 4 is the same as for Rows 1 & 2
  • Repeat again for Rows 5 & 6, and then 7 & 8.
  • Keep doing it until you finish

Progression

All Done, At Least with the Smocking

  • After the first two or three, I grew tired of having to tie off the loose threads in the back. The pleats are still fairly tight, and that made it a little more difficult.
  • Once I was done with the smocking, I took out the gathering stitches.
  • Loosened the pleats.
  • Then I tied down all of the loose threads.
  • Front view

  • Back side

All that was left was to hem it and add the apron ties and waistband.

Do I like it?  Yes, I think it is beautiful.

Can I improve on my techniques? Absolutely! Even looking back through the pictures I saw a couple of things I can do better on next time. All-in-all, smocking can be fun!

Beginning to Smock

I take back all the bad things I said about cartridge pleating and blackwork counted stitch embroidery. Smocking! That’s the real pain in the tush!

It’s for the decorative apron I’m making for my Christmas Revel A&S entry. It’s a project for which I have the documentation. It’s not so big that it’ll take months and months to complete, but it has a degree of complexity.

Yesterday, I looked over the documentation. The pleating part looks like cartridge pleats but on a larger scale. I figured that since I know how to do cartridge pleats, this should be no problem. Wrong! My problem is that it is so much larger and getting the pleating marks even is not easy.

At first I berated myself and told myself that I must be daft if I can not figure out how to do this. That was after I spent 5 hours doing this:

Ignore the squiggly on the side; it’s part of an abandoned project. As you can see, the dots are no where near even. At first I was trying to use the edge to make the dots line up. I gave up on that and drew a base-line to use. Still, even with my fancy ruler they would not line up. Plus I was making the dots 1/2″ apart, and after thinking about it (and 5 hours of cursing) I wanted them closer together.

It really didn’t help that I was doing this on my lap, using a large cookbook as a table. I was kind of in the middle of a Psych marathon with my 14 year old and didn’t want to get up.

So, I gave up on this end. I turned the linen piece around and made a straight edge by pulling threads out and cutting along the missing thread line:

The dots may be hard to see from the faintness, but they are much straighter. I used my favorite ruler that let me see through to match up the now straight fabric edge to the measuring lines. It’s not perfect, but it’s not bad. It still took over 4 hours to do (and I’m not quite done yet).

All of this work left me a little anxious to get into the actual smocking, but I realized that I was still unclear about some of the details.

Sometimes before you can learn something new, you need to figure out what not only what things are called, but what questions you need to ask. So I needed to hit the books again and do a bit more research.

My first question was how do you get the pleats (and/or) dots even without going insane.  Turns out that it’s not that easy. My having problems with it wasn’t unusual. In fact they make specific tools just  for getting the dots even when smocking, such as iron-on smocking dots and dot templates. They also make machines that do nothing but make the pleats for smocking. Wow! So I’m not such a nutter-head for having a difficult time doing this.

I got some tips and thought of a couple of creative ways on my own to make the dots even and less time consuming. More on that later.

Then I started asking other questions:

When making the pleats, does it matter if I work from left to right and from top to bottom?

With the dots, do I go up one hole and down the next? Or do I go down slightly to one side of the hole and up slightly to the other side (or vice/versa)?

What about needle angle? Should it always be perpendicular to the fabric? Or can I use a running stitch?

And the type of needle. After it’s pleated what kind of needle do I use to smock? Long or short? Sharp or ball-point?

I found out some of the answers, and the rest I figure I will learn by trail and error.

So I put my nice linen down, cut a piece of cotton muslin and decided that it’s mock-up time. What will I use my mock-ups for? Casual wear. My girls could wear them. Or I just may give one out as a door prize when I teach a class on this stuff.

One things I did discover is that there are very little tutorials on-line on smocking from the beginning to the end of a project.  So I plan on making one. A smocking for dummies tutorial. That will come much later after I’ve learned it myself.

It may seem like I flit about from one project to another, not finishing any – or at least that’s what my husband thinks. But I’m not.

Side-laced cotte update:

  • Washed the fabric yesterday
  • Have one or two more dying test batches to try out before deciding on a color
  • Should be dying the fabric tomorrow

Blackwork Coif:

  • Still working on my needle-case in order to learn counted stitch blackwork embroidery.
  • Have the flowers and patterns picked out for the coif
  • The scroll-work design has been transferred to the linen I’ll be using.
  • I still have to decide on  exact placement and sketch it out, but I’ll do that after my needle-case is done.

Off to sew!

Christmas Revel Prep

I’ve felt run down for the last few days, but I was hoping it was just a low iron week. I added my vitamins back to my daily regimen in hopes that would I feel better, but I’m still tired. This morning I woke up coughing. At least with the vitamin increase, I should be able to fight off this bad boy a bit faster than normal. I’ll just cure it with some hot toddies. Ooo, and I have a grog mix I’ve been wanting to try.  I do have to run out to get the Thanksgiving turkey today, but after than it’s bed for me.

The realization that I will not get done with my blackwork Elizabethan coif in time to enter it into Christmas Revel’s A&S has hit me. Counted stitch blackwork is very, very slow. I’m not even half done with my needle-case cover, and all I’ve done on the coif is planned and sketched it.

So, I spent part of last night looking through the documentation I’ve gathered for projects that I haven’t yet made, and I decided on the pleat-work embroidered apron.  Since my next non-A&S compliant project is the side-laced cotte (I’m just going to  machine-sew it), I want something to bling it up. Not much jewelry was worn in the age of cotehardies. By the time they introduced waist-lines, even the girdle was not tremendously popular. However, in a few manuscripts and woodcut prints you see a very fancy apron.

It’s white, although I have seen a couple of other colors, and it’s most probably linen.  Along the top, normally gathered edge, you see pleat-work, sometimes plain and sometimes with embroidery on top of it. It looks very much like smocking in some of the pictures. I’ve never done smocking (I’m a virgin smocker), but it looks suspiciously like cartridge pleats – rows of evenly spaced gathering stitches.

This apron is seen from the early  14th to the mid 16th centuries. So I can wear it with my cotes or my late period Flemish garb, which makes it a pretty versatile accessory. Here are a few examples.

14th Century Pleatwork Apron

Early 14th Century
Brown pleat-work apron with white edging

Early 15th Century


Mid 16th Century

Now to figure out the how, and hopefully later tonight I’ll start the pleating.


On Yer Heade Part IV: Men’s Headgear in the14th Century

The diversity of styles and colors of headgear increased greatly in the 1300’s. Although there are still uncovered heads shown in the manuscripts, it really does complete the outfit more when appropriate headgear is worn.

This post is by no means a complete list of men’s hats and hoods. It’s simply some of the more common types, listed hopefully to help you become a better dressed reenactor.

Men’s 14th Century Headgear

Coifs

Hoods / Liripipes

  • The diversity of hoods increases greatly this century.
  • We still have the simple hood with a moderate length tail
    • Smithfield Decretals

  • Liripipes
    • And we now have hoods with long tails. These hoods are often called liripipes
    • Romance of Alexander

  • Decorations, at least for the wealthier folk, are a must
    • The hood can be a simple one colored hood with no lining, but it still generally had decorations of embroidery and/or bead-work around the bottom edge.
      Romance of Alexander

    • Make it a bit more interesting by making it bi-colored (right and left halves different colors) with simple embroidery and/or beading around the bottom edge.

    • Add another element of awesome and combine your bi-colored hood with an outfit (cotehardy in this case) that also has the same two colors alternating.
      Romance of Alexander

    • Lining it with a contrasting color also looks nice. (Two guys on the far left).
      Romance of Alexander

    • Combine several decorative elements and:
      – line it with a contrasting color
      – make it bi-colored
      – add a decorative contrasting color for the edge
      AND
      – add embroidery and bead-work or even appliqué on the bottom edge
      Look at the dude on the left – awesome style on the front of his cotte
      Romance of Alexander

  • Non-standard bottom edges
    • As you can see in some of the above pictures, the edges weren’t always flat.
    • There’s the purposeful tattered look
      (Don’t laugh! Remember buying torn, acid-washed jeans?)

    • Here’s a picture of rounded dags (on the left) and the tattered look (on the right)

    • Another dagged one

    • One with a scalloped edge
      Smithfield Decretals

      The ultimate fancy edging
      Shaped like leaves

  • Hoods for Fools
    • Some modern references to the 14th century hood associate them as jester hats. That is not too far from the truth
    • The entertainers of the day, including fools and jesters, wore a version of the hood.
      Romance of Alexander

    • Even a 2-tailed version

Chaperons

  • Sometime in the early 14th century, someone took their hood and stuck the face opening on top of their head. Why? I have no idea, but think of some of the modern fashions that have stemmed from someone wearing something “wrong,” like wearing a baseball cap backwards. This style took off, and in no time hoods were worn with the face going over the head and the old head-hole dangling off the back or over the front.
    • Taccuino Sanitatis

    • Roman de la Rose

    • Roman de la Rose

    • Romance of Alexander

    • Codex Manesse

    • Codex Manesse

    • Romance of Alexander

  • By the end of the century, you can’t even tell, unless you look for it, that the chaperon stemmed from the simple tailed hood.

Wide Brimmed / Wicker Hats

  • You see the wicker hats, but they are still primarily worn on the working class people.
    • Smithfield Decretals

    • Queen Mary Psalter

    • Codex Manesse

Felt Hats

    • Codex Manesse

    • Codex Manesse

    • Queen Mary Psalter

Miscellaneous Hats

  • Possibly what the Phrygian cap turned into.
    Bible by Guyart des Moulins

  • Rus-like hat
    Bible by Guyart de Moulins

The Elusive Side-Laced Cotte

Finding evidence for this cotehardie that I want to make is proving a bit more difficult than I thought. It’s out there, but under what conditions, I don’t know.

Here’s the problem: for the most, part the pictures from manuscripts are very cartoon-ish.  They give a general shape and idea, but they don’t show seems or closures.

Here’s what I found so far:

Visitation – 1445
Panel painted on oak
Rogier van der Weyden

This is a definite side-laced fitted gown.  Of course, you can’t just look at the what, you also have to look at the who. The lady on the right is Elizabeth, cousin to Mary (from the Bible).  They are both pregnant, Mary with Jesus and Elizabeth with John the Baptist. Thus the intimate feeling of the bellies.

So yes, the cotte exists, but was it maternity wear?

Abegg Triptych
1445 – oil on oak
Rogier van der Weyden

Yes, it’s the same painter. Also, the side-lacing isn’t completely clear. A search for a better resolution of this pic may be in order.

Depostion
15th Century

The lady in red is definitely wearing a side-laced gown. It is waisted, and I am looking for unwaisted examples. But it is certainly a side-laced dress.

I’m not sure who painted the one above. Heck, I’m not even sure that the name is correct, but it does look like the same style of der van Weyden’s 15th century Flemish style. It gives me something to go on.

Tacuinum Sanitatis
1390’s

This one is a bit earlier than I wanted, but not so terribly early that it’s un-useful. Those sleeves, though . . . Wow!

I have a couple of other iffy pics from manuscripts. If they were of a better resolution, I could maybe use them. The only other solid thing I have is this one:

I have no idea where it is from, what time period or the artist, but it certainly is a side-laced kirtle. And a good shot of spiral lacing.

Tip: if you are going to make any kind of medieval or Renaissance laced dress, check out Jen Thompson’s Zen of Spiral Lacing post: http://www.festiveattyre.com/p/the-zen-of-spiral-lacing.html It will help you get it right the first time.

One thing I find utterly ironic about this quest of mine is that it has led me to Flemish artists as the main source.  At least for the moment.  I was certain I would find what I was looking for in Italy or France, but never back to Belgium. This whole obsession of mine with period garb started out with the 16th century Flemish peasant dress. So in the last year, I’ve come full circle.

Pattern Your Own Simple Coif / Unpadded Arming Cap

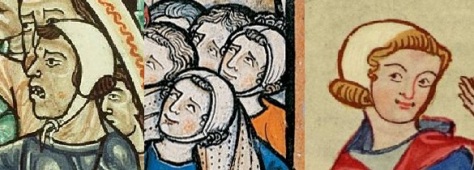
Period Coifs / Caps
Left: 12th Century
Middle: 13th Century
Right: 14th Century

The plain coif/cap is probably the most versatile piece of garb in the Middle Ages. It was worn for centuries and  changed very little.  It was worn by both sexes. It’s comfortable, practical and easy to make.

Called many different thing, from coif, cap, or hood.  In other languages: koaff, bundhaube, kveiv, kveif, haube, coiffe, huva or kapper. It is essentially a close fitting hat, fastened under the chin using straps.

For events like Gulf Wars, Pennsic or Estrella, having several caps is a must. Keeps the sun off your head during the day and your head warm at night.

If you have kids wear medieval clothing, nothing looks cuter than a child running around wearing a plain linen or cotton coif! And since their hair is often thin or sparse, it keeps their head from burning.

Fabric:

  • Linen: if used under a helm, linen is a must. It wicks the sweat away from the head and gives a cooling effect.
  • Wool: if used to keep your head warm, a lightweight wool is nice. If it’s too itchy, line it with linen.
  • Cotton: a non-period less-costly alternative. Light muslin makes a nice summer coif to keep the head cooler.

 Colors

  • White-ish

 2 Piece Style:

  • Good from early period all the way through the 14th and possibly the 15th century.
  • Even women wore this style in the later centuries.
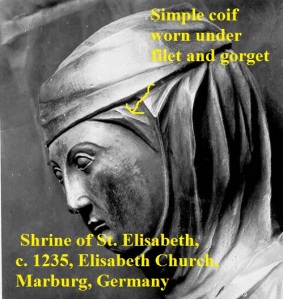
    • They used the simple coif under their veils, filets, wimples or gorgets to give something solid that those pieces could be pinned to.
  • This style was used as a padded arming cap as well.

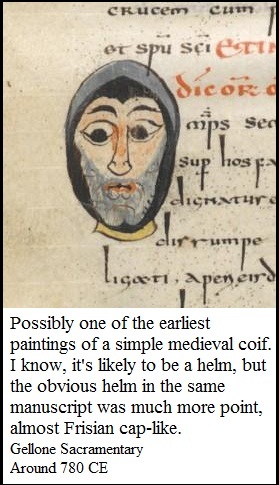
Simple Caps / Coifs in Period

8th Century

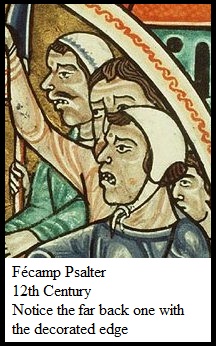
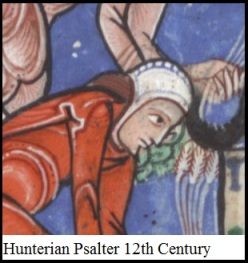
12th Century
Fecamp Psalter

12th Century
Hunterian Psalter

13th Century

Padded Arming Cap / Coif
13th Century
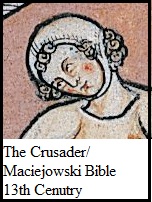
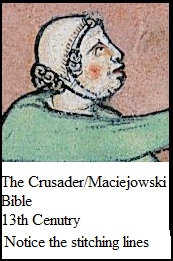
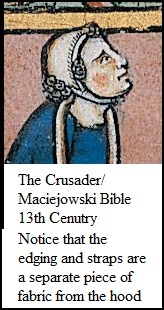
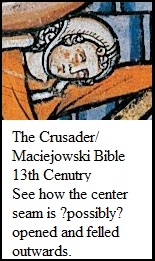
Morgan / Crusader / Maciejowski Bible

14th Century
Manesse Codex

14th Century
Roman de la Rose

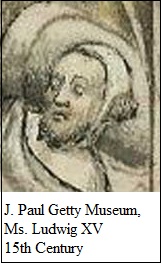
15th Century

15th Century
Jean Froissart Chronicles

Even women wore simple coifs
13th Century Germany
Shrine of St. Elizabeth

Measuring

I have a hypothesis: all garb patterns can be reduced to mathematical equations. Perhaps it’s true of all clothing in general, but I’m only working on garb.

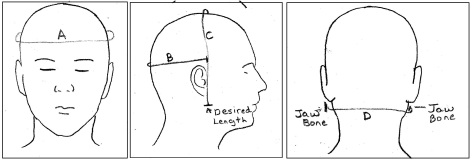
click to enlarge

A = length around your crown

B = Measure around the larger part of the back of your head from the front of one ear to the front of the other ear

C = Measure from the desired length of your cap on one side, around the top of your head to the desired length on the other side.

D = Measure around the base of your head from jawbone to jawbone

A  = __________

B = __________

C = __________

D = __________

The Math

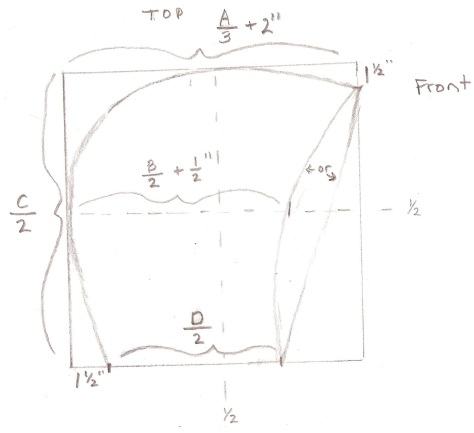
  1. Width of the pattern: Divide A by 3 {A/3} than add
    1. 2” for an average head
    2. 3” for a larger head
    3. 1” for a child’s head
    4. _________________
  1. Length of the pattern: Divide C by 2 {C/2}

_________________

  1. Draw a rectangle with the above dimensions
  2. Write “Top” and “Front” in the appropriate parts of your pattern
  3. Mark or fold the pattern in half in both directions, just for reference
  4. On the bottom edge:
    1. From the back, mark 1 ½ “ (1” for a child’s head)
    2. Divide D by 2 {D/2}
    3. _______________
    4. From the 1 ½” mark, go towards the front D/2.
    5. This is the bottom edge of your coif.
  5. On the center-line(halfway between top and bottom):
    1. Divide B by 2 {B/2}
    2. Add 1/2”
    3. ______________
    4. From the back side, on this centerline going towards the front, mark the above measurement
  6. On the front top edge
    1. Mark 1 ½” down from the top (1” for children)
    2. We’ll use this mark later

Click to enlarge

Connecting the Dots

  1. Let’s start at the bottom back.
    1. From your 1 ½” mark in (or 1” for a child’s cap)
    2. Curve a line up towards the back center-back
    3. Have the line meet the back edge about an 1 to 1 ½” below the center line
    4. Run the line along the back-edge through the center-back line and above it another 1 to 1 ½”
  2. Curve the line up towards the center top line
    1. Similar to the center-back, have the line meet the edge about ½ to 1” before the centerline and run along it for ½” to 1” after before curving down.
    2. Curve the line towards the 1 ½” mark (1” mark for children) on the front edge
  3. Front edge
    1. Two choices
      1. For a straight front: draw a straight line connecting the mark on the front top  edge to the D/2 mark on the bottom edge
      2. For a curved front: curve the line down towards the D/2 mark, intersecting with the B/2+1/2” mark on the centerline.

ADD YOUR SEAM ALLOWANCE when cutting  – ¼” to ¾” depending on your sewing style

Unless, you are making a 13th century styled cap with separate “hem tape.”

 Styles

Tight Fitting Cap

The above pattern will produce a fairly snug cap for you

Looser fitting Cap

To get a cap that is a bit looser, add an extra ¼” to 1” when adding the seam allowance.

Padded Arming Cap

This pattern can be used to make a padded cap as seen in the Crusader Bible.

  1. Add an extra ¾” to 1” to the pattern.
  2. Cut 4, rather than 2, pieces
  3. Sew the center and front together, but leave the bottom back open
  4. Make the quilting lines (the dashed lines you see in the picture)
  5. Stuff the hat with fluffed out cotton balls or scraps of linen. Use a wooden dowel or rod to pack the material into the grooves.
  6. Squish it around with your fingers so that the padding is mostly even.
  7. Hem up bottom back.

Making the straps

We’re making simple straps. You can customize them, but we’ll do simple first.

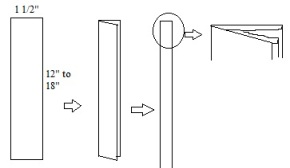
  1. Cut out two long rectangles of fabric
    1. About 1” to 1 ½” wide
    2. 12” to 18” long
  2. Fold them in half length-ways and iron.
  3. Fold each side in half length-ways and iron again.
  4. On one end of each strap, fold the rough end into the lengthwise fold to hem that side.
  5. Sew the edges

Sewing

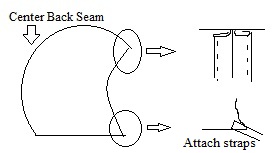
  1. Cut 2 of your coif pattern
  2. Sew up the center seam.
  3. Tuck under and iron the seam flat with each side folded over to its own side. Sew along edges to tack the seam down
  4. Hem the front and bottom by folding under the edges, ironing them flat and sewing them.
  5. Attach the straps to the front bottom corner

You are unless you want to add decorative elements if you like. Or leave it plain.

Enjoy your cap!!

On Yer Heade Part III: Women’s Headgear in the14th Century

This is the third post on figuring out which hats go with which outfits, or at least that is how the idea started. I wanted to look more period, and one way to do that is by wearing the appropriate headgear with your garb.

I sorted and categorized, and then I put together my notes into a class handout. What you see here is an expanded edition of my class. It should help you look more period, however you do have to know what century your outfit is from.

Head accessories explode this century, which is why I’m  breaking this century into two posts – one for the women and one for the men.

Women’s 14th Century Headgear

  • Veils
    • The simple veil is still around and not only worn by the lower class, but you rarely see the simple veil worn by the wealthier women.  It can be worn by itself or held down by a circlet.
    • Simple Veil
      From the Smithfield Decretals

    • Veil with decorated edge
      From the Codex Manesse

    • Simple veil held down by flowers or possibly beads or pearls
      From the Codex Manesse

  • Veil with Something Else
    • More frequently than seeing the simple veil, we often see a veil worn with another piece of headgear.
    • I have deeper explanations of these additional elements in my “On Yer Heade Part II”
    • Veils with Gorgets
      • A gorget covers the neck. It was a tube that draped around the neck and sometimes covered the upper chest.
      • Veil with a gorget
        From the Smithfield Decretals

      • Veil with a gorget
        From Queen Mary’s Psalter

      • Veils with gorgets
        From the Romance of Alexander

    • Veil with a Fillet and/or Barbette
      • Wealthier women often wore veils with more decorative elements such a a fillet and barbette.
      • It also gives you something on which you can secure your veil.
      • Again, refer back to “On Yer Head Part II.”
      • Veil with a fillet (cloth crown piece) and barbette (piece that goes under chin and over head)
        From the Codex Manesse

  • Barbette and Fillet Combo
    • You can also see the barbette or barbet (piece that goes under the chin and over the head) and fillet (cloth crown) together
    • Again, for a more full description refer back to “On Yer Head Part II”
    • Barbette and Fillet
      From the Manesse Codex

    • Barbette and Fillet with braided hair
      From the Smithfield Decretals

    • Barbette and Fillet with a Crispenette (hair net) over braided hair
      From the Hours of Jeanne d’Evreux

  • Braids or Templars
    • This is the century of elaborate braids or templars, which were braids worn on the sides of the head (think Princess Leia, but with braided buns).
    • The diversity in the braids is limited by the imagination. Nearly every braid picture I found was at least slightly different from the others.
    • Feeling inadequate because you don’t have hair long enough to braid? Then use hair extensions to make the braids and pin them to your own hair. And yes, it was actually done in period too.
    • Dropping Braids with a braided back
      From the Romance of Alexander

    • Bun-like Braids
      From the Romance of Alexander

    • Braids wrapped around head
      From the Smithfield Cecretals

    • Braids wrapped around head
      From the Visconti Hours

    • Dropping Braids with a Fillet
      Head of a French Noblewoman

    • Braids with coronet and something I can’t identify hanging down the sides
      From statue of Marie de France daughter of Charles IV of Franc

    • Braids
      From the Romance of Alexander

    • Dropping braids with a braided bun
      From the Smithfield Decretals

    • Braids
      From the Smithfield Decretals

  • Birgitta’s Coif or Huva
    • You can still see the coif that is referred to as Birgitta’s coif. The only extant piece we have of this particular headgear was supposed to belong to St. Birgitta.
    • I have a full write-up of the coif and instructions on  making it in another post: St. Birgitta’s Huva
    • The cap I made on the left and the extant piece on the right.

    • From Taccuino Sanitatis

  • Crespinette
    • A crespinette or crispinette is a woven net that is worn over the hair. The hair is often braided under the crespinette. Wealthier women would have had gems or beads woven into it or have had it made with precious metal.
    • Crespinette
      From the Codex Manesse

  • Hoods
    • The Fourteenth Century sees hoods becoming popular with women. You mostly see the open hood variety – a hood that is not closed under the chin.
    • A common misconception is that these hoods are a later period Dutch hood. I’ve seen this hood far more often in the 14th and 15th centuries manuscripts made in western Europe, especially in France.
    • If you want to make one, a good tutorial to start with was posted on Craftster.org: http://www.craftster.org/forum/index.php?topic=272745.0
      • They call it a London Hood, but I’ve also seen it called a French Hood, and it doubtless has many other names.
    • Hood with floppy top
      from the Roman de la Rose

    • Open hood with floppy top
      from Codex 2592

    • Open hood with a possible coif underneath
      From the Roman de la Rose

    • Open hood with a contrasting color for the lining
      From Roman de la Rose

    • Back view of hood
      from the Romance of Alexander

    • Open hood. The lady to the right is wearing templars.
      From the Romance of Alexander

    • Open hood
      From the Romance of Alexander

  • Ruffled or Frilled Hoods
    • One last headgear category that emerges this century is the ruffled hood.
    • It’s mostly seen in effigy statues rather than in manuscripts.
    • It’s very similar to the open hoods seen above, but the front edge has elaborate “ruffles,” which look very much like smocking.
    • Here is a more thorough description of the hood: http://m-silkwork.blogspot.com/2007/04/fretworked-veil-headdress-of-catherine.html
    • Ruffled hood
      Effigy of Johan von Hozehausen

    • Ruffled hood
      Effigy for Catherine of Warwick

      This is by no means a definitive list of women’s 14th century hats. There were many other types of headgear worn in this century. Especially if you look at manuscripts and statues from specific regions, you will find headgear that was worn in only one or two areas. But this article gives you a place to start.