Rus Embroidery #4

I’ve been having fun sketching Viking Rus embroidery designs from period sources.  Their artwork, as I may have said before, is this amazing mix of Viking, Byzantine and Eastern.  I’m still researching on the stitches they used, but I haven’t yet found enough to post anything.

Here’s a new design. It’s based on a sword hilt from 11th century Ukraine.

Neckline / collar

rus embroidery 5 d wm


Hem, Sleeves and other Straights

Rus Embroidery 5 f wm

Documentation

rus embroidery 5 wm

Embroidered Neckline #1 – Rus based

I’m trying to expand my designs for necklines and wanting to base my patterns on period artwork.  The ones I like the most combine curves and plant elements.  I found this one based on a 10th – 11th century Rus sword. Making the design curve around the neck was trickier than I thought it should be, but I think it came out rather nice.

To use it, enlarge it until the neck hole is large enough for your neck. It will probably take at least two A4 sheets of paper, possibly 4.  Tape it together on the reverse side of the pattern.  I use Sulky iron-on transfer pens to get the pattern onto the fabric.

Remember, it is best to work the embroidery before doing anything other than cutting out the body piece.

rus sword design 10th c 2 wm

Matching cuff and edge trim.

cuff2

Updated 3/27/2016

Found the original picture of the sword hilt where the design came from.

Typical pattern of the Kievan Rus X-XI, this comes from the hilt of the sword, Kiev (Ukraine). Date about 1000 AD.
Kirpichnikov, AN Ancient weapon. Moscow: the Leningrad-Dep of Science, 1966. Archaeology of the USSR. p117

neckline 1

Not Your Normal Neckline, Part 2

Patterning

Continuing on where we left off, we’re going to explore how to pattern necklines based off of your body dimensions.

Whenever I talk to someone about their garb, I always ask them what they do not like about the garb they currently have.  Rarely do they dislike how it looks.  Most often, it is the fit that makes them like or hate their garb.  About half of the time, it’s how the garb fits in the shoulder area, and the other half is the way it fits in the neck.

If the neck is too tight, it feels like it’s choking you. If it’s too loose, you get a sunburn in weird spots or you feel the need to keep adjusting it so it does not fall off.  Most people new to making garb fall into the trap of making the neckline too big, and it is very difficult to make it smaller again.

Over the years I’ve tried several ways of measuring and patterning necklines, from using the neck and head circumference in a long math formula to holding up a clear quilting measuring square and plotting out the neck shape from there.  I’ve not had much luck with these methods despite that they seem like they should work.

The neckline measurement technique I’ve had the nest luck with is based off of Mistress Margaret Bruce’s “Magic Neckline Trick”, which was a brilliant idea of using body proportions to create a perfect neck-hole.  You can find her original handout here:

http://www.chesholme.com/wfiles/2-2-Magic-Neckline-Trick-Pt-1.pdf
http://www.chesholme.com/wfiles/2-3-Magic-Neckline-Trick-Pt-2.pdf

I tested her trick out over the years and made my own modifications. Remember that this is a general technique that works with my family. You may need to adjust it depending on head shape and neck size.

With this method, you end up with the smallest possible neck-hole that will fit over your head.  If you want a larger opening or something that is scooped or shaped differently, use the method as a starting point. Begin enlarging by adding length to the front, not the back and definitely not the sides. Adding length and width to the back and sides will make an ill-fitted neck-hole.

With children, use this method as a starting point. Children’s heads are not proportional to the rest of their body and are almost always big compared to their other parts.  

Step 1

We are working with only one half of the neck-hole. Whatever pattern we end up with, we will fold the paper in half along the vertical line (up and down line) and cut out both sides at once.  This way, we have a neckline that is the same shape on both sides.  Left or right, it does not matter. I find it easier to work with my left hand because I am right handed.

step 1 wm

Take a large sheet of paper or tape several sheets together.  Near the center, draw a set of perpendicular lines.

Step 2

step 2 wm

On the top section of the perpendicular lines, mark the width of your first two fingers at their widest.  On my hand, my first two fingers are the widest close to the knuckles.

Step 3

step 3 wm

On the left (or right) side of the center, mark the width of your 4 fingers at the widest. On my hand, my 4 fingers are the widest where the fingers and palm connect.

Step 4

step 4 wm

On the bottom section of the lines, make a mark the width of the widest part of your whole palm, including your thumb.  On my hand, this point is just below the thumb.

Step 5

At this point, you have a mark on the top and bottom of the vertical line and a mark on either the right or left of the horizontal one.  Label the top mark A and the bottom mark B.

step 5 wm

Measure the distance from point A and point B. Write this number down somewhere.

Measure around your head where it is the widest. My head is the widest near my temple, but depending on your head shape you may need to measure over the ears or nose.  Write this number down as well.

Step 6

Take your head circumference and divide it by 3.  Take this new number and subtract the length of AB from it.  Add that amount to the bottom of your lines and mark it point C.

step 6 wm

If you are lost, that’s fine. I’ll show you what I mean.

Example

step 7 wm

After measuring my hand, the distance between points and B is 6 inches.  My head is 21 inches around where it is the biggest.

21″ ÷ 3 = 7″

I subtract the 6″ of my original AB line from the 7″.  7″-6″=1″

Just below point B, I add 1 inch and mark that point as point C.

If the circumference of your head does not divide evenly by 3, use a fraction. For example, 22″ would be 7 1/3″.  23″ is 7 2/3″.

This plot is what we will use to make all of your neck openings.

Making Round Necklines

Let’s start out with your basic round neckline.

round 1 wm

This is fairly easy. Connect point to the mark on the horizontal line. The tendency is to go straight across, but round it out instead.  I use a French curve to make sure that I’m getting the most rounded line I can.

Connect point C to the same horizontal mark.  Again round it out.

That’s it!  That is your neck-hole. For the basic round neckline, you will ignore point B. Do not adjust this hole for seam allowance or hemming.  The opening works best when it is opened a bit more by hemming it or sewing it to a facing with 1/4″ allowance and clipping the curves.

Now fold the paper in half along the vertical (up and down) line and cut out the half circle you drew.

When you unfold it, this is the smallest possible round neckline that will fit comfortably on you.  If you want it larger, start by trimming on the bottom.

008 Round

Round Neckline Facing

round 2 wm

Once your have your basic shape, you can use the shape to cut out your neck-hole or you can use it to make a neck facing or contrasting color of fabric.

How wide do you want the facing or contrasting fabric? How big of a hem do you need on the facing edge?  Add these two numbers together.  (I usually do a 2″ facing with a 1/2″ hem allowance, making my sum 2 1/2″).

From points A and C and the mark on the horizontal line, make a mark the length of your sum.  For me, that is 2 1/2″. Label these marks D, E and F.  Connect D, E and with a rounded line that follows the curve of your original half-circle.

Fold the circle in half and cut out both the internal and external circle, like this:

013 Round 2.jpg

The top line becomes the center back. The bottom line becomes the center front and the two side lines become your shoulder lines.

Round Neckline with Split Front

Many people like the tighter neckline, but they need a bit extra of an opening to get their heads through.  You can accomplish this with a slit in the front.

round 3 wm

Instead of connecting the horizontal point to point C, connect it to point B.  Then from B to C make a small diagonal opening.

That’s it! It gives you a tighter neck so that you don’t burn as much, but the slit makes it so that you can pull the tunic over your head.

round 4 wm

To make the facing, use the same technique as your did for the round neckline, but make a key shape around point C.

Tricks and Tips for Making Necklines Easier

Tip 1:  Do the neck first
Cut out and finish the neckline right after you have cut out the body and before you sew any side seams.

Most people do the neckline last.  Why? At this point you have to work with fabric that is not flat but is curved by the sleeves and side seams.  Why not start with the neckline?

If you cut out and finish your neck right after you have cut out the body and before you do anything else, you work with a nice flat piece of fabric. It not only makes it easier to sew, but it will lay better when you have finished the garb.

Tip 2: Don’t cut the hole until it’s sewn on the body
If using facing or a contrasting color, sew the neck and the body together before you have cut any holes out.

Yeah that sounds weird, but fabric moves. And once you cut a big hole in it, it will move even more.  Cut out your body.  Mark your shoulder points and center front and back  on the body piece.  Cut out your neck facing or contrasting neckline fabric. Mark the shoulder points and center front and back on the neck.  Using your paper template, mark the hole on the neck facing with tailors chalk or a water soluble fabric pen.

Pin the neck facing to the body piece. Sew them together right on or a 1/4″ outside of the neck hole line you drew.

Now cut the neck hole out, turn the facing over and stitch or hem it to the body.

You are welcome!

I have the diagrams for making the other shapes, but I’m done for the day. My kids, which I homeschool, need to start their lessons and it’s already 11:00.  More later.

Happy Garb-Making!!

Not Your Normal Neckline – Part 1

A survey of different styles of necklines from period sources.

Take a look around at the clothing most medieval re-creationists wear. The vast majority have the same neck-hole – round or round with a front slit. There are variations, but mainly in the decorative contrast fabric.

From what we know of period clothing, from both extant pieces and art, necklines were more varied than what we see. My purpose here is more to inspire than to educate. All of the necklines that I sketched are from period art sources, mostly manuscripts but also art such as monuments or paintings.

The necklines are divided into three categories based on the shape of the opening: round, triangular and square. I did not find many necklines that went outside of these categories, but within each category there is a-lot of diversity.

Round Necklines

Round wm.jpg

Triangular Necklines

Triangles wm.jpg

Square Necklines

square wm.jpg

Neckline Variations from Period Sources

The holidays always seem to find me ill. This year wasn’t so bad, but I was down with a cold for over a week. I always think I’ll get some online stuff done with I’m convalescing, but I never do. Mostly, I just sleep.

There are only two, maybe three, more installments of the Viking women’s garb, but I’ll get to that another day. This week will mostly be filled with prep for Winter Wonders, possibly one of our only definitely cold events. The boys have outgrown all of their old garb, and so sew, sew and sew some more I must do.

To hold you until I continue on Viking garb, I’ve been working on this little reference sheet for neckline varieties from period sources. I’m sticking to sources before the early 1200’s so that they are suitable for early period garb.

Spread it, pin it, posts on facebook, but above all enjoy it! Belated Happy Holidays!

Women’s Viking-Age Garb Part 4: Step 3 What to Wear over the Gown

I took a break for a couple of days for the holidays.  We had a beautiful Winter/Solar-Festival/Christmas/Yule/Hogswatch holiday.  Whatever you want to call it, the midwinter celebration is one of my favorites.

Continuing on in my Women’s Viking Garb series, today I’ll talk about what does a Viking woman wear over her gown.  Remember this is a mash-up series.  I’m not looking at any specific point in time and place, but this series mashes together all of the Viking-age and all of the places considered “Viking.” I’m trying to paint a general picture for the re-enactor who wants a Viking-age persona, but doesn’t quite know a specific time or place that her persona would be from.  The outfits described here give you an “authentic” Viking look without limiting you to one specific region and time period.

Step 3: What to Wear over the Gown

Choices:

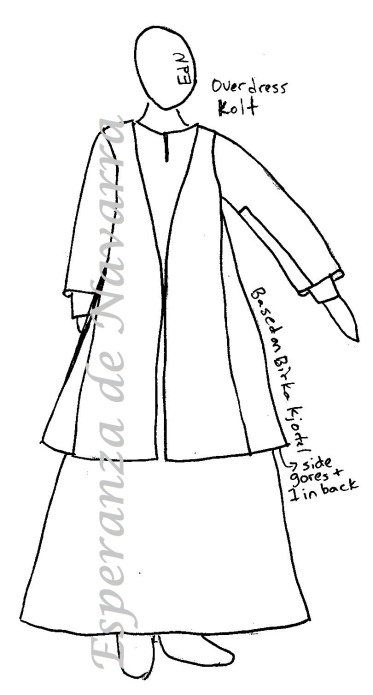
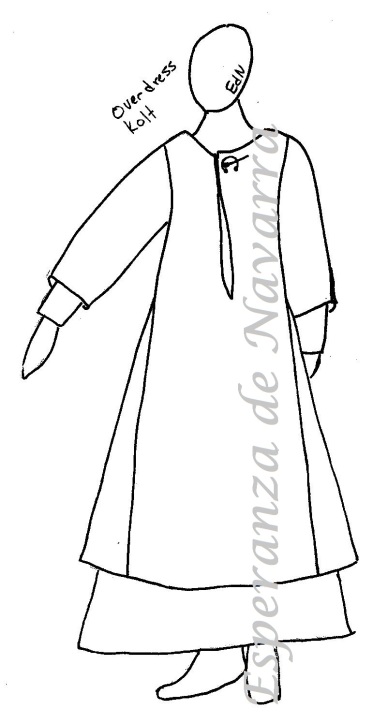
  1. Large Over-gown
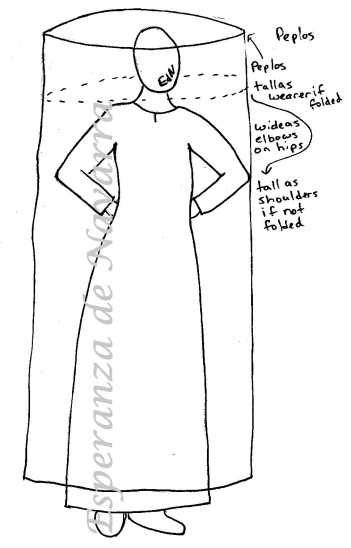
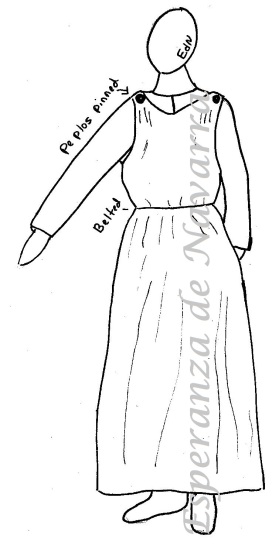
  2. Peplos
  3. Hangerok (Apron dress)

Choice 1: Large Over-Gown

  • Length: Calf length or higher
  • Sleeves: Wrist or Forearm length, looser sleeves
  • Wool or Linen

Style can be based on any gown from step 2, but it is generally a size or two larger in order to accommodate the clothing you would be wearing under it.  The sleeves and hemline are often a bit shorter.

The gown can also be split up the front, like a jacket.

Coat birka

Or it can be closed in the front like a coat.  These will be discussed further when I discuss what to wear when you are cold.

coat 2.jpg

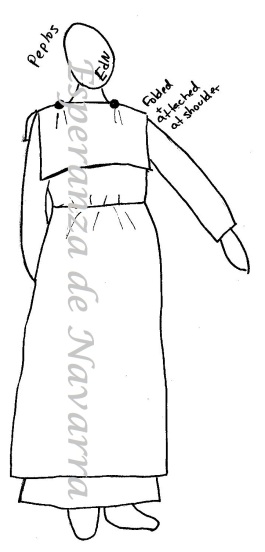
Choice 2: Peplos

A peplos is a simple tube that is as wide as you with your hands on your hips and as tall as you. It was worn more in the Finland region.

  • Length: Possibly from right below the knee to the ankle
  • Front and back held together on shoulders with clasps

When worn, it is generally folded down on top to about armpit level. It is then held up in many, many ways, each one giving a different look. As you can see, a long sleeved tunic gown is worn under the peplos.

Peplos 1

Peplos 2Peplos 3.jpg

Choice 3: Hangerok / Apron-Dress

At its very basic, it’s a simple tube held on by straps that go over the shoulders.  Not much different in essence with the Peplos, with the main difference of the addition of the straps.

  • Fabric: wool or linen
  • Straps: sewn on to back
    • held on to front by brooches, usually with loops

The different styles are based not only on geographical diversity, but also on the differing opinions of the various archeologists.  As of yet (and of my current research) there is no complete extant apron-dress. We have many, many pieces of the tops, especially the loops, but not enough to make a definite guess as to what the finished product looked like.

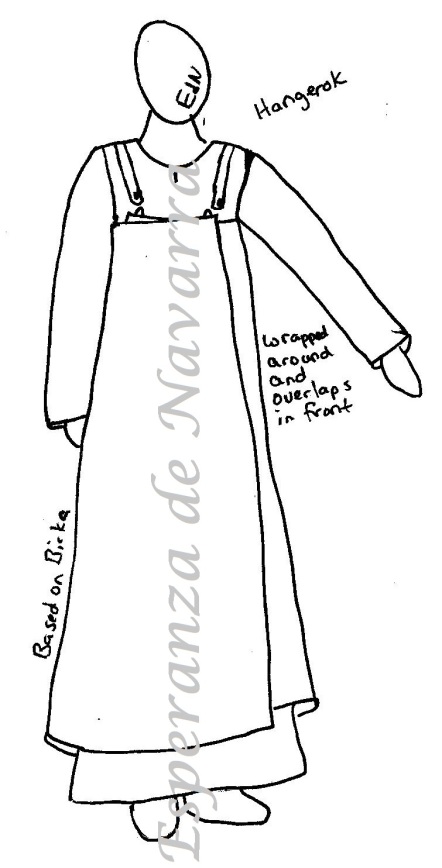
Apron-Dress Style 1

The first style is essentially a large rectangle that is wrapped around the body and held closed with loops that are connected to brooches (not shown in illustration).

Hangerok 1

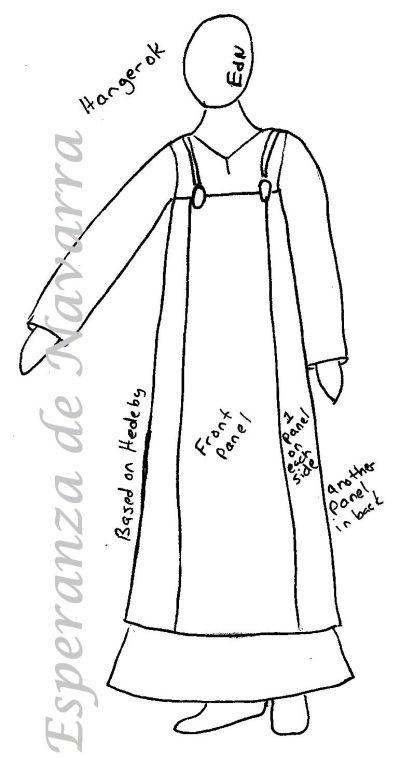
Apron-Dress Style 2

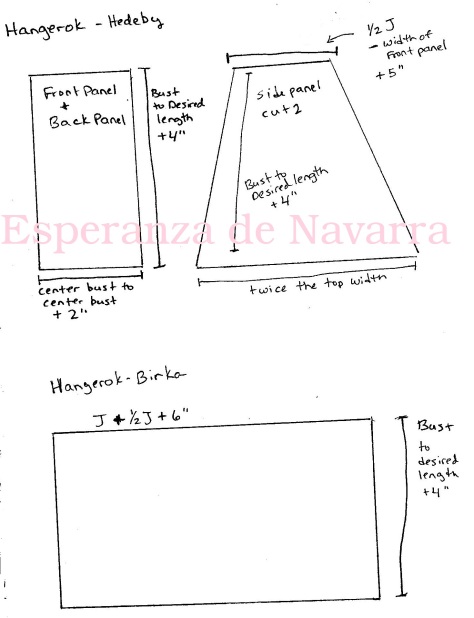
The second apron-dress is based on the finds found in Hedeby and Inga Hägg’s writing on the apron-dress.  This dress has a panel in the front and back, and has one to two panels on each side.  The front and back panel is more rectangular, while the side panels have a more trapezoidal shape, giving the dress more flare at the bottom.

Hangerock 2.jpg

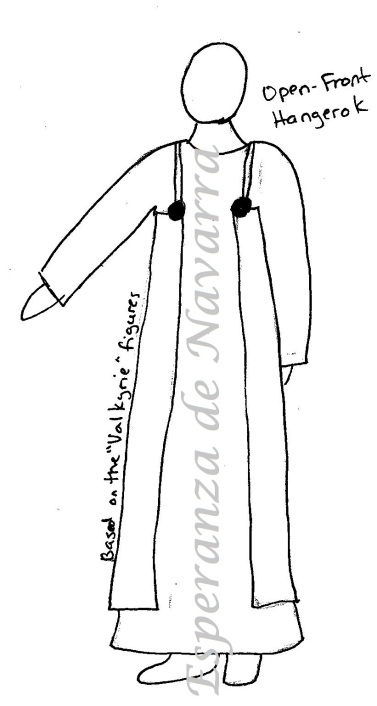
Apron-Dress Style 3

This style is based on Flemming Bau’s ideas behind the apron-dress.  His idea is that the apron-dress was not closed in the front.  Again, it’s essentially a rectangle, but instead of being closed in the front, it was open and usually had a simple apron completing the “circuit.” (apron not shown in illustration)  The apron would hang into the brooches with separate loops.

Hangerok 3

Apron Dress Style 4

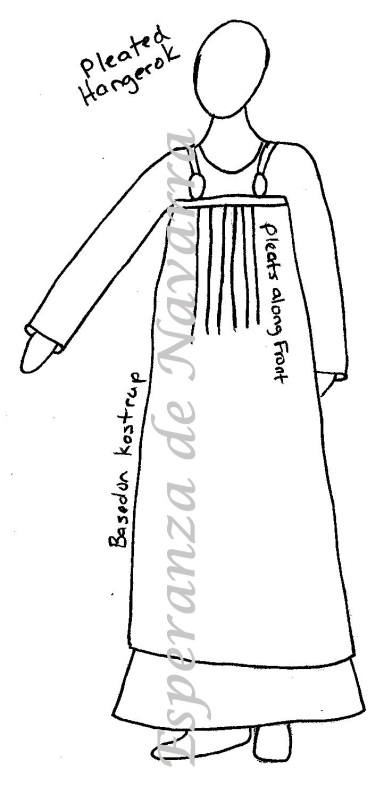
The final dress is based on the Kostrup pleated apron-dress. In this style, there is a series of pleats that run across the top of the front panel.  The pleated fabric gives the width to the bottom of the dress.

Hangerok 4


Pattern for the Hedeby Apron-Dress

pattern 6

Women’s Viking-Age Garb Part 3: Step 2 The Gown

Step 2 : Gown

Not optional – must wear

Did you choose a chemise?

  • Yes
    • Then this gown could come down to mid to lower calf level
    • Linen or Wool
  • No
    • The gown should come down to ankle level
    • Linen or wool (wool is itchy next to skin)

Decorative Elements:

  • Tablet-woven bands
  • Silk strips
  • Embroidery

Different Styles

Style 1: Hedeby Harbor Gown

Long sleeved gown with underarm gusset and one high gore in the center front.

Gown Hedeby 1


Style 2: Hedeby Gown

Gown with several trapezoidal pieces that make up an attached skirt.  The bodice section has several, sections and the sleeve is in 2 parts and has a modern-like curved top.

Gown Hedeby 2


Style 3: Moseland Gown

This gown is your classic Viking-age tunic/gown with underarm gussets, front and back center gores and high side gores.

gown moselund


Style 4: Finnish Style

An interesting style where the bodice and sleeves are not separate pieces.

gown finnish

Patterns

Pattern measurements are based on my original croquis:  https://maniacalmedievalist.files.wordpress.com/2015/12/croquis-ultimate-2.jpg

Pattern 1: Hedeby  Harbor Gown

pattern 3 wm

Pattern 2: Moselund Gown

pattern 4 wm

Pattern 3: Finnish Style Gown

pattern 7 wm


Women’s Viking-Age Garb Part 2: Step 1 The Chemise

Step 1: Chemise

Definition: the thinner “gown” you wear closest to your skin and made of light to heavy fabric. It’s ankle length, but the arms can go from nearly sleeveless to wrist length

Optional: yes.
Do you want one?

  • Yes
    • Ankle length
    • Arm length:
      • wrist
      • shoulder
    • Linen or maybe hemp
    • 2 styles
      • Style 1: Plain
      • Style 2: Pleated
  • No
    • Move on to Step 2: Gown

Style 1: Plain

Based on many pieces from Birka and Hedeby. This style is a plain gown, almost what we think of as a t-tunic. It should include gussets (under-arm wedges) and gores (side triangles)

chemise 1


Style 2: Pleated

Pleated chemise. Needle and thread used to make pleats 2 to 3 mm deep. The fabric is then moistened, dried and the threads pulled out.

chemise 2


Patterns for Chemises

Pattern for Plain Chemise

pattern 1.jpg


Pattern for Pleated Chemise

pattern 2


The letters on the patterns refer to my old croquis:

Croquis Ultimate 2.jpg

Women’s Viking-Age Garb Part 1

This series is based off of a class I taught earlier this year.

Introduction and Disclaimers

This class has some over-generalizing of information from cramming together years of clothing from different Scandinavian/Nordic cultures into one hand-out. But my purpose is not to document specific items as much as it is to increase the types and combinations of garb worn by Viking Age SCA’dian women.

I based as much as I could I based my ideas off of extant clothing and artwork. Don’t get fixated on terms. For example, an apron dress is not called that in other languages (even translated) or back in period. Although terms give us a common language to know what talk about, any term is not THE term for the item. For more elaboration on this idea, check out my blog entry: “A Cotehardie by Any Other Name Would Look Just as Lovely – Some Thoughts on Research” [https://maniacalmedievalist.wordpress.com/?p=447&preview=true
]

Basic Information

In the Viking Age, clothing was worn in layers. Which layers were worn depended on a few things, from the climate to the person’s social status. Although the styles were different in different regions, there are many consistencies from finds from modern day Finland to Germany.

Inga Hägg, one of the leading archeologists for Viking age clothing, identified certain components of the Viking woman’s costume.

Hägg ‘s terms / Terms we’ll use

  • särk / chemise
  • tunika/ gown
  • kolt / large over-gown
  • hängselkjol / hangerok
  • tröja / jacket (open in front)
  • kaftan / coat (closed in front)
  • mantel / mantel (sometimes, you can’t improve on a word)

Step 1: Do you want to wear a chemise?

Step 2: Gown.

  • If you have an undertunic, gown should be
    • Calf length
    • Linen or wool
  • If you have no undertunic, gown should be
    • Ankle length
    • Linen or wool (wool is itchy w/out an undertunic)

Step 3: What to wear over the gown

  • Large Over-gown
    • Calf length
    • Fore-arm length sleeves
  • Peplos (also call Greek or Roman chiton)
  • Hangerok (apron dress)

Step 4: Do you need something to keep you warmer?

  • Jacket (open in front)
  • Coat (closed in front)
  • Mantle (shawl)

Step 5 Accoutrements

  • Wrist clasps
  • Bead strings
  • Brooches
  • Apron