Russian Goldwork Year 2

My second year of studying goldwork embroidery has started!!!   For about a week, I almost did not join.  Time has been so stretched for the last year, and studying something in a language I do not speak is not the easiest.  What changed my mind was the regret I would have if I did not continue.  It’s an opportunity that may never come around in my lifetime. The chance to study Russian goldwork with the experts is something truly special.

So here I am in the first week of year 2, and I have my first assignment finished!

The assignment was to use a solid surface and attach the gold thread in a way that hides the attaching thread and makes the gold thread lay in the correct direction after each stitch.  Looks easier than it was (at least for me).  The stitch was confusing, as you can see from my backside.  The backside stitches should look like a herringbone stitch, but I did not manage that until partway through the 2nd section.

I love learning something new!!!

I used Sulky gold colored thread for the nicer parts. The thread we are supposed to use, which has real gold content, is not sold in the U.S., so I’m fudging with what I have.  The closest and most reasonably priced shipping is from a shop in the UK, but it will be a week or two before it gets here.

The art homework I still have to finish. So until next time . . .

Happy Stitching!

blog sig

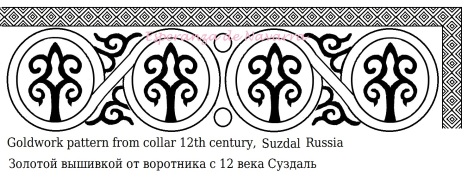
Russian Goldwork Embroidery Design from 12th c. Suzdal collar

I’ve been working on ideas for my elevation gown, and of course it must have Russian goldwork on it. The underdress will have embroidered collar and cuffs, and I’m using a pattern found on a 12th century collar from Suzdal.

It’s a design I’ve sketched out a couple of times, both a simplified version and one closer to the extant piece. Like many early Russian patterns, it incorrporates 2 of my favorite motifs: the tree of life and the simple scrollwork.

In case anyone else is feeling inspired to do some Russian goldwork, I wanted to share my sketch. It’s a little cleaned up using the computer, but it should work well.

Esperanza sudzal collar 12th c.jpg

Happy Sewing!

Russian Cuffs – entry 2

Reality strikes home when admit that there are days, sometimes in a row, when I do not touch my computer! 🙂 Seriously! So, how can I blog everyday if I am not on-line?

The truth is that I can not. So instead of beating myself up for instantly flunking my own challenge, I will rework it. 10 blogs in the next month. More realistic for someone who can spend more than one day at a time in the sewing room and loving every minute of it!

Enough of that – now on to the cuffs.

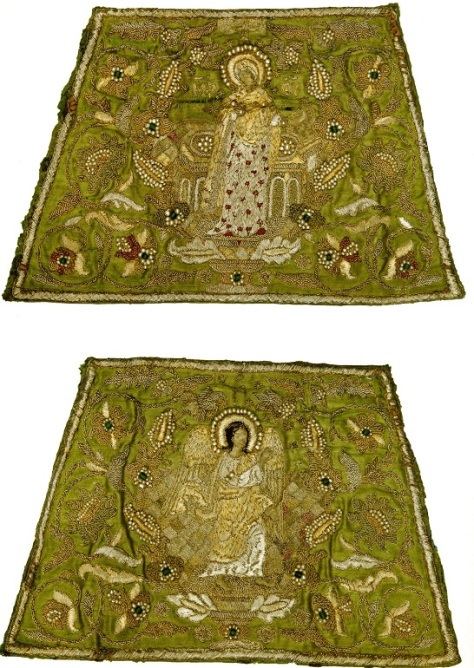
To recap, my next project is to use all of the skills I learned this last year in Ubrus to make a pair of 16th century Russian cuffs. Here’s one:
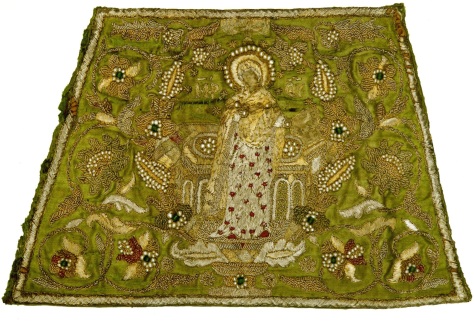
Pic: “Благовещение.” Иконография восточно-христианского искусства. Web. 13 Apr. 2017

Last time, I worked on analyzing the design pattern. Jelena, my Ubrus art teacher, has spent the last few months teaching us to recognize and analyze the traditional scrollwork on period Russian art. We’ll see this pattern over and over again in Russian embroidery. The symmetry of the curls can change into different patterns, but once you start to look for them, seeing the scrolls helps to pick apart the repeats and re-create what, at first, looks really complicated.

To begin to make your own transfer, you need to make some choices. My arms are smaller than whoever wore the original cuffs. Do I shrink the elements or cut some out? I like to keep the feel as close as I can. As odd as it sounds, taking elements out keeps my work feeling closer to the original than shrinking it. One big reason is that I can not shrink the material I’m going to use. The kanitel (gold and silver purl) only comes in so many sizes.

First thing I do is to sketch the figure out on my cuffs dimensions and get as much onto something that will fit me.

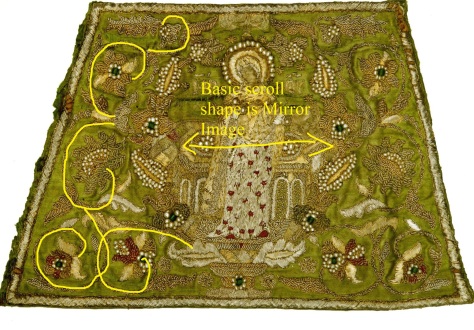
After drawing out the size of my cuffs, I roughly sketch the scrolls onto an actual sized mock-up. Looking at the original, both sides are mirror. That means I only have to really sketch out one side and then flip it.
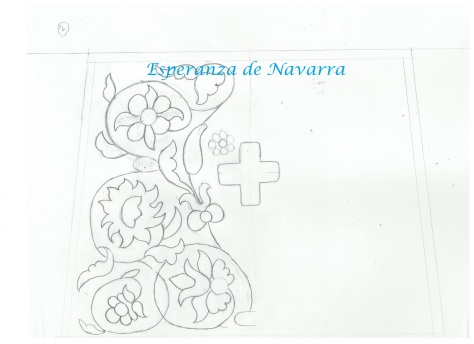
Taking out the middle figure gives me space to keep most of the flowers. Yay! It’s the flowers I really like. Once I get a good sketch for a transfer, I can use my cheats, aka tracing paper, to make the other side.
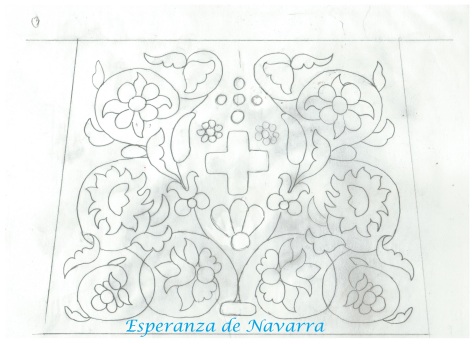
Please forgive the pencil smudges. 😉

I get asked a-lot if you can use my images for your work. Please do!! I want making art easier on all of us. If using something I sketched helps you, please do! The only thing I request (not demand) is that you share your work with me. That’s only because I love seeing what you guys are up to.

Sketching out my design was fun, but how will it looks when I start to fill it? Curiosity got the better of me, so I used some copying and pasting to give me glimpse of what it will look like.
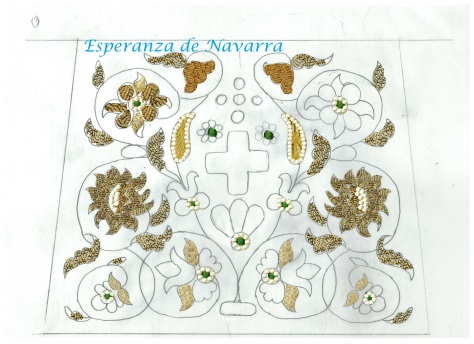
I spent more time than I want to admit pasting texture into my sketch, but I like what it’s going to look like!

I’m trying hard not to spend more than 30 minutes or so on each blog. That way I don’t obsess over my writing and spend more time on the art. Today I want to transfer my patter to the green silk and pick through my supplies to see if I have enough. I may, if I’m ambitious, make my own green glass beads to use on this. A bonus is that torch-work makes my neck pain better.

TTFN!!!

Esperanza de Navarra

New Project: Cuffs, entry 1

After falling in love with Russian goldwork embroidery, I want to make something to really show off the art style itself. I want it to be something I can wear – after all, clothing is the best place to show others new ideas. I’m thinking cuffs since it doesn’t need to be washed and, unlike collars, they are not attached to the clothing at all. Plus it’s something I can wear with multiple dresses. Perfect!

After looking at many period cuffs, I found one I’m going to base mine one, but with some changes. Most of the cuffs have saints or religious figures in the center, after all, they are made for the church. I want something more ornamental, but still period – perhaps a cross.

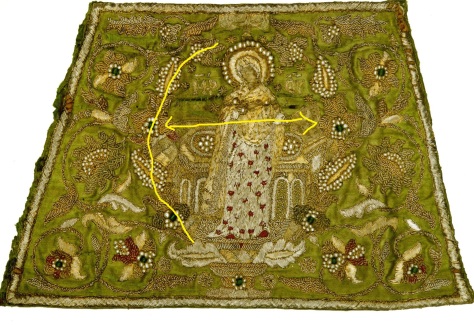
The main piece for my inspiration is “The Annunciation,” a 16th century piece currently found in the Museum of the Monastery of Putin. It’s embroidered with gold thread, silver thread, silk and gold and silver kanitel. It also has pearls all over it and a few glass or gemstone beads. The base is a light green silk, and I have a perfect piece of fabric to use.

Pic: “Благовещение.” Иконография восточно-христианского искусства. Web. 13 Apr. 2017

I have the details. Now to sketch out the design.

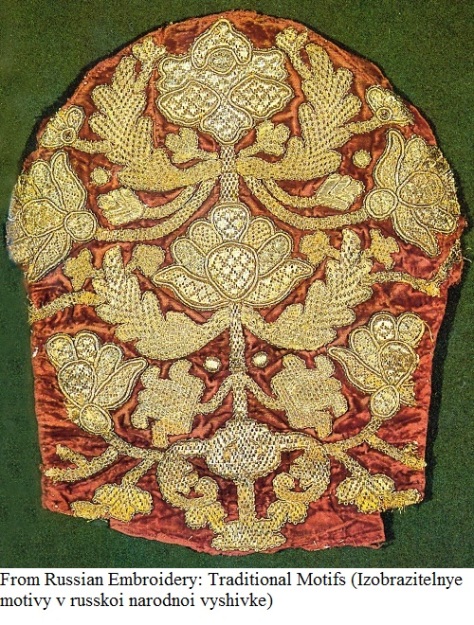
Basic art style: Most of these cuff fall into 3 basic design types. All 3 types have a central figure or figures, usually saints, but sometimes a geometric shape, such as a cross. Two of the types are bordered by archways. I’m not doing those, so I’m not going to get into the specifics (trying really hard not to get off track). The third type has a central element surrounded by vegetative scrollwork. This is my type!

I’m going to take the basic principle of the layout, but change up some of the flowers and leaves. Everything needs to stay consistent with the time period and art style. Let’s take a look at the style.

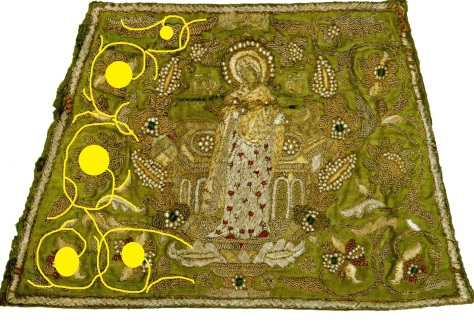
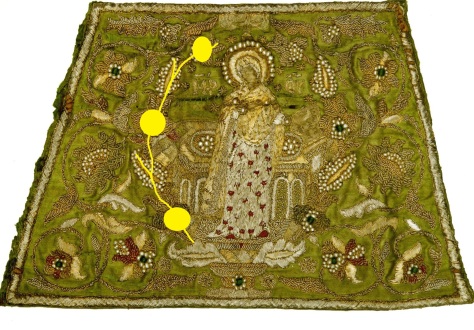
The scrollwork shape is mirrored on the left and right. It can be divided up into two separate scroll sets. The first is more loopy and curves around the outside. Above you can see the basic shape of the curls.

Here’s the curls with the flowers and leaves added in. Once you get the basic design, the rest is just dressing. The second is simpler and surrounds the central figure.

It is also mirrored and left and right sides.

Here it is with the flowers and leaves added in. The basic shape of the scrollwork is more important than the flowers and leaves. Once you get the basic shape of the design, you can pick and choose the ornaments.

Both stem from a base that is under the central figure. The left and the right cuffs (I don’t know which is which) have the same basic scroll patterns even though the flowers are different.

I like this scroll design! I’ve seen several that are similar in other Russian goldwork pieces and in many other pieces of Russian art from the same time period. None are exactly alike, but the elements seem universal. I’m going to use this basic design.

Now to find flowers and leaves!!

I’ll be sketching some rough shapes out and will hopefully have some progress to show tomorrow.

Until then, do some art! 🙂

Esperanza de Navarra
My Tedious Art

I am not an artist, but I have always wanted to be one. Since I was little, making beautiful things has been one of my life goals. Art does not come easy to me. As a child, my doodles did not look much different from random scratches on a paper.

When I started classes with Ubrus, 1/3 of our lessons was art, specifically in drawing. “Ugh!” I thought. This is where my amazing lack of natural skill and talent is going to show itself. However, I underestimated Jelena, our art teacher.

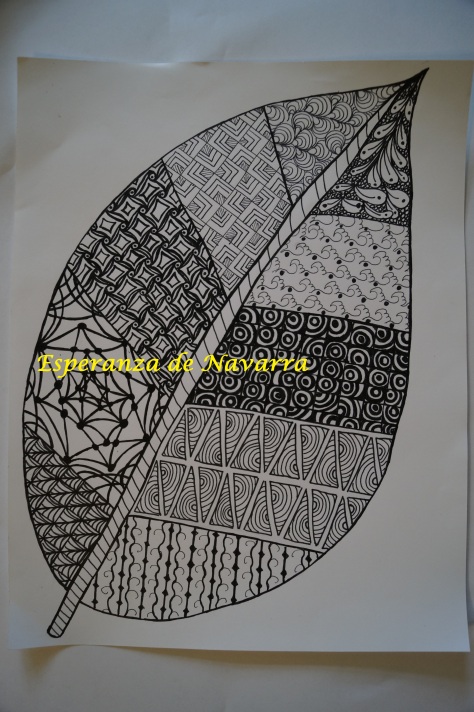
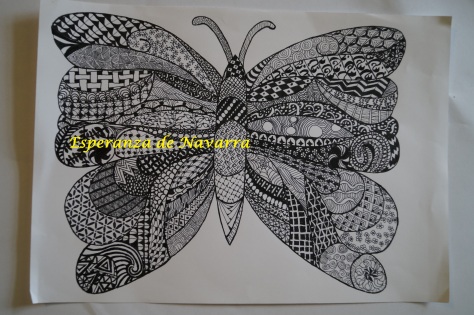
For the first few weeks, we did intuitive drawing. Popularly called zen doodling now, it is a way to free your mind of preconceived notions about drawing. We learned to take simple shapes and build on them to create texture in our drawings.

I started to look at everything as a potential for a design. As I look around my room now, from the texture patterns on my walls to the way the doorknob looks from this angle can all be turned into a doodle pattern. Although I had seen books at the grocery check-out on this type of drawing, I did not know how truly fun and liberating it could be.

One of the first concepts I had to rid my mind of was “originality.” I find myself often striving to create something completely unique that I frighten myself and end up not creating anything. With our intuitive drawing exercises, we were encouraged to look up the many patterns others have created. Putting pencil or pen to paper was more important than coming up with our own design.

At first I thought we were encouraged mainly to get us to do something. Doing something is better than doing nothing. As I learned more about Russian art, I came to realize that their artwork, then and now, is steeped in tradition. The difficulty is to perfect your ability to do the craft, not to create new approaches. Such a simple thought can change so many other thoughts.

The more I drew, the easier and better it became. I began to see that my lack of natural skill did not matter. Maybe I will never be a famous artist, but who cares! I was having fun and making pretty things – my lifelong goal.

Yes, my work was still sloppy, but if I could see myself improving in such a short time, then I knew that I COULD improve.

It was then, while browsing through pictures of Russian goldwork, that I saw something that made the intuitive drawings even more relevant – the fill-in of the goldwork. Traditional Russian goldwork is not flat. Going back centuries, we can see the same patterns that fill in our doodling designs in the gold thread.

Amazing, isn’t it!

I encourage everyone to pick up pencil and paper and try this method of intuitive drawing. Only by learning to see the curves and patterns and shapes of the world around us can we improve the way we create art.

Go out and draw something!!
Esperanza de Navarra