What do I put my stuff in?

I’ve been obsessed with totes and bags for ages. I have an entire pinterest board ( my pinterest ) ( my pinterest page dedicated to totes) dedicated to nothing but tote-bags! In the SCA, at least in Gleann Abhann, I don’t see much of a practical bag in use, other than the “man-bag” that many a dude will carry court time refreshments in.

Bags are so useful! The bags I’m talking about are the kind with long thick straps that you can throw over your shoulder and carry a ton of stuff = modern day bo-ho bag. But are they period?

It’s a side adventure, but I want to start looking at useful period bags made of cloth. If you have any pics, post them in the comments. Between all of our combined skills and knowledge, we can bring the bag back to the Middle Ages!!

wink

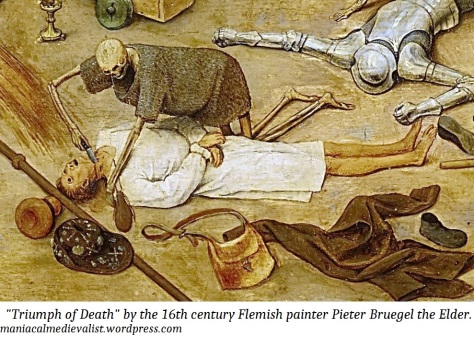
I’ll start. Found this guy in the “Triumph of Death” by the 16th century Flemish painter Pieter Bruegel the Elder. It makes sense. If you are running for your life from a bunch of bloodthirsty skeletons, you really need something practical to stick your stuff in.

To me, I see a nice cloth satchel, almost a “messenger bag,” ​with both and adjustable strap and a buckle flap. How awesome is this?!?!

Off to make some art.

Happy sewing!

Russian Cuffs – entry 2

Reality strikes home when admit that there are days, sometimes in a row, when I do not touch my computer! 🙂 Seriously! So, how can I blog everyday if I am not on-line?

The truth is that I can not. So instead of beating myself up for instantly flunking my own challenge, I will rework it. 10 blogs in the next month. More realistic for someone who can spend more than one day at a time in the sewing room and loving every minute of it!

Enough of that – now on to the cuffs.

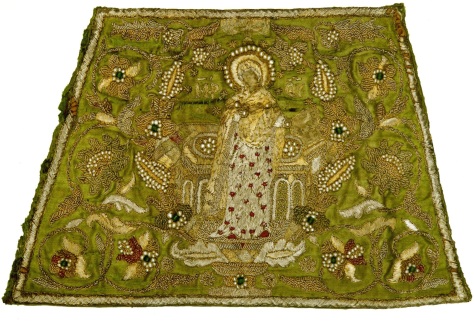
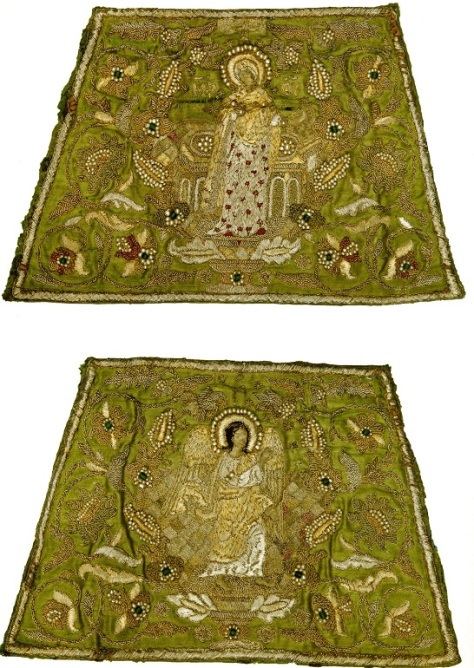
To recap, my next project is to use all of the skills I learned this last year in Ubrus to make a pair of 16th century Russian cuffs. Here’s one:

Pic: “Благовещение.” Иконография восточно-христианского искусства. Web. 13 Apr. 2017

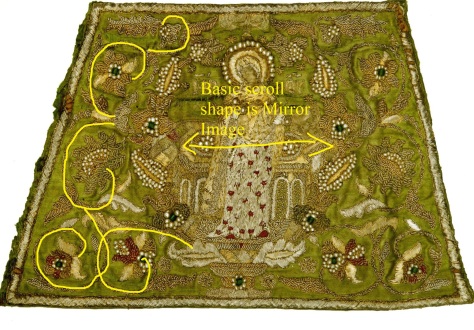
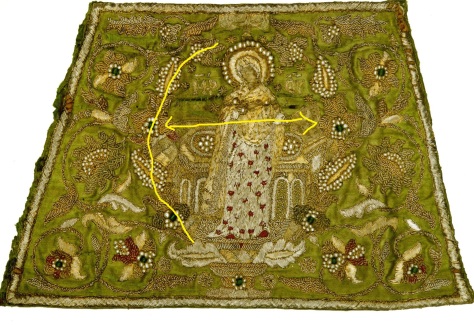
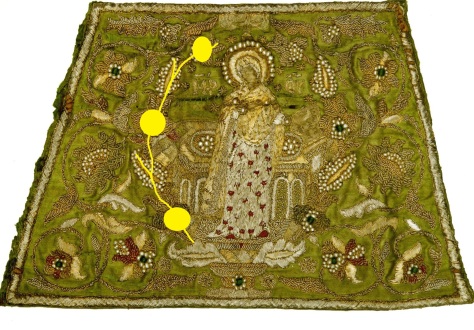
Last time, I worked on analyzing the design pattern. Jelena, my Ubrus art teacher, has spent the last few months teaching us to recognize and analyze the traditional scrollwork on period Russian art. We’ll see this pattern over and over again in Russian embroidery. The symmetry of the curls can change into different patterns, but once you start to look for them, seeing the scrolls helps to pick apart the repeats and re-create what, at first, looks really complicated.

To begin to make your own transfer, you need to make some choices. My arms are smaller than whoever wore the original cuffs. Do I shrink the elements or cut some out? I like to keep the feel as close as I can. As odd as it sounds, taking elements out keeps my work feeling closer to the original than shrinking it. One big reason is that I can not shrink the material I’m going to use. The kanitel (gold and silver purl) only comes in so many sizes.

First thing I do is to sketch the figure out on my cuffs dimensions and get as much onto something that will fit me.

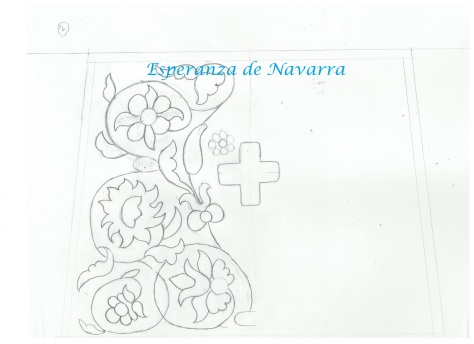
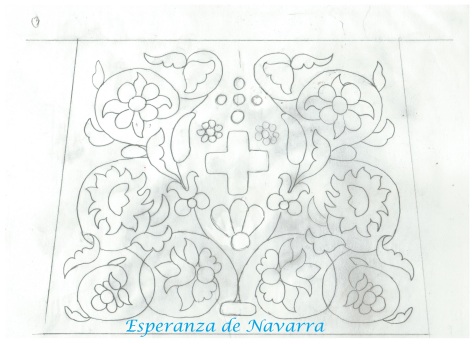
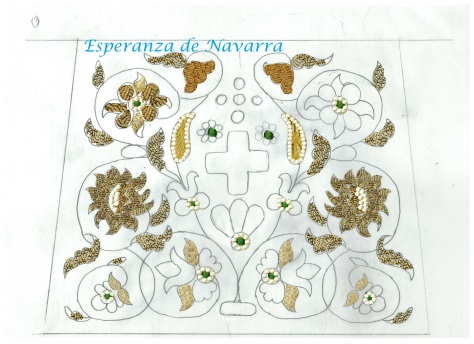
After drawing out the size of my cuffs, I roughly sketch the scrolls onto an actual sized mock-up. Looking at the original, both sides are mirror. That means I only have to really sketch out one side and then flip it.

Taking out the middle figure gives me space to keep most of the flowers. Yay! It’s the flowers I really like. Once I get a good sketch for a transfer, I can use my cheats, aka tracing paper, to make the other side.

Please forgive the pencil smudges. 😉

I get asked a-lot if you can use my images for your work. Please do!! I want making art easier on all of us. If using something I sketched helps you, please do! The only thing I request (not demand) is that you share your work with me. That’s only because I love seeing what you guys are up to.

Sketching out my design was fun, but how will it looks when I start to fill it? Curiosity got the better of me, so I used some copying and pasting to give me glimpse of what it will look like.

I spent more time than I want to admit pasting texture into my sketch, but I like what it’s going to look like!

I’m trying hard not to spend more than 30 minutes or so on each blog. That way I don’t obsess over my writing and spend more time on the art. Today I want to transfer my patter to the green silk and pick through my supplies to see if I have enough. I may, if I’m ambitious, make my own green glass beads to use on this. A bonus is that torch-work makes my neck pain better.

TTFN!!!

Esperanza de Navarra

New Project: Cuffs, entry 1

After falling in love with Russian goldwork embroidery, I want to make something to really show off the art style itself. I want it to be something I can wear – after all, clothing is the best place to show others new ideas. I’m thinking cuffs since it doesn’t need to be washed and, unlike collars, they are not attached to the clothing at all. Plus it’s something I can wear with multiple dresses. Perfect!

After looking at many period cuffs, I found one I’m going to base mine one, but with some changes. Most of the cuffs have saints or religious figures in the center, after all, they are made for the church. I want something more ornamental, but still period – perhaps a cross.

The main piece for my inspiration is “The Annunciation,” a 16th century piece currently found in the Museum of the Monastery of Putin. It’s embroidered with gold thread, silver thread, silk and gold and silver kanitel. It also has pearls all over it and a few glass or gemstone beads. The base is a light green silk, and I have a perfect piece of fabric to use.

Pic: “Благовещение.” Иконография восточно-христианского искусства. Web. 13 Apr. 2017

I have the details. Now to sketch out the design.

Basic art style: Most of these cuff fall into 3 basic design types. All 3 types have a central figure or figures, usually saints, but sometimes a geometric shape, such as a cross. Two of the types are bordered by archways. I’m not doing those, so I’m not going to get into the specifics (trying really hard not to get off track). The third type has a central element surrounded by vegetative scrollwork. This is my type!

I’m going to take the basic principle of the layout, but change up some of the flowers and leaves. Everything needs to stay consistent with the time period and art style. Let’s take a look at the style.

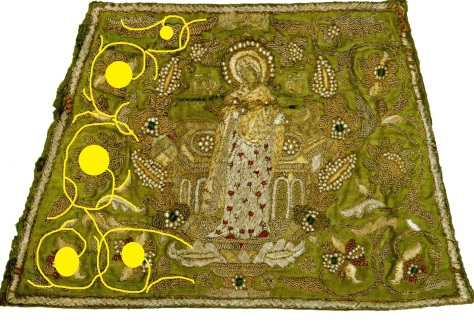
The scrollwork shape is mirrored on the left and right. It can be divided up into two separate scroll sets. The first is more loopy and curves around the outside. Above you can see the basic shape of the curls.

Here’s the curls with the flowers and leaves added in. Once you get the basic design, the rest is just dressing. The second is simpler and surrounds the central figure.

It is also mirrored and left and right sides.

Here it is with the flowers and leaves added in. The basic shape of the scrollwork is more important than the flowers and leaves. Once you get the basic shape of the design, you can pick and choose the ornaments.

Both stem from a base that is under the central figure. The left and the right cuffs (I don’t know which is which) have the same basic scroll patterns even though the flowers are different.

I like this scroll design! I’ve seen several that are similar in other Russian goldwork pieces and in many other pieces of Russian art from the same time period. None are exactly alike, but the elements seem universal. I’m going to use this basic design.

Now to find flowers and leaves!!

I’ll be sketching some rough shapes out and will hopefully have some progress to show tomorrow.

Until then, do some art! 🙂

Esperanza de Navarra

Pleated Embroidered (Smocked) Apron: Mock-Up #1

First, I finally got the fabric I’m going to use for the side-laced cotte dyed!!

Freshly Dyed Fabric

I love the color! I was thinking it would be a bit more blue-ish, but I am pleasantly surprised by the results. I put it next to my white muslin for comparison.

I ended up using Dharma’s fiber reactive procion colors:

One part #30A Emerald Green

One part #32A Electric Blue

And 3/4 part #46 Brilliant Blue

On to the Pleated Apron

My first mock-up of the embroidered pleated apron is done!  It’s a style of aprons that popped up around the mid 14th century and lasted until the late 16th century without changing much in style. I found a couple of new pictures demonstrating the over 200 year range of this accoutrement.

Luttrell Psalter
1320 – 1340 England

Detail from The Seamstress
Edward Schoen 1535

What I like, other than the bling quality, is that it makes the simple apron not so simple and allows it to be worn with fancier garb.

Last time I left off, I was having problems simply getting the dots straight. Here’s what I worked out.

That green thing in the upper right is a home-made Bat-a-rang I made for my son’s birthday party 3 years ago. I still find those things everywhere!

I made a perfect rectangle of a piece of cotton muslin by pulling threads. Here’s a quick and dirty tutorial on it: http://www.sewing.org/files/guidelines/4_204_straightening_fabric_grain.pdf

I squared the edges on my large fabric cutting board and used the marks to make a line nearly across the entire apron every half inch.  Half an inch was too big on one of my previous attempts, but with the method I’m trying, it’s perfect.

Keeping the fabric still lined up on the mat, I marked every 1/2″ in the perpendicular direction. The fabric did slip quite a bit, so generally between each row I would re-straighten it on the mat. It doesn’t matter how many rows you make, but it needs to be an even number (we’ll get to that later).

At this point, I have eight long lines going across, and about 70 dashes going up and down.

Somewhere I read a tip that said do all of the gathering stitches at once. So I threaded 8 needles – I used sharp, medium length embroidery needles. I used normal DMC embroidery floss in a light, but not white color. Avoid the urge to use a completely contrasting color, like red. I did that with the cartridge pleats on my partlet, and when I pulled them out, it left red residue in the holes.

The method I used was I ran along the length-way lines. A smidgen before every dash, I pushed the needle through the fabric. Using the same motions used in a running stitch, right after each dash I came back up.

Tie the back ends of the thread together in batches of 2 and 3. It makes it easier to adjust when gathering the fabric.

When you get to the end of your threads, but still have more line to finish . . .

Start pulling the gathers. That’s why you tied the threads off at the other end and why it’s easier to work all 8 rows at once.

When I finished gathering the gathers, I thought that it looked way too small. I knew that I wanted the apron wider than this.

So I set about spreading the folds and trying my hardest to keep the columns straight. Then I laughed and realized that the smocking will loosen the gathers. I re-pulled the threads together, although not as tight as I did at first.

Take a chop-stick, or something like it, and pock into each pocket created by the gathered threads. It is tedious, but when you are done . . .

all of the rows line up nicely, and . . .

the front looks just lovely.

Now for the smocking. It helps if you understand the pattern first before the stitches.

The Pattern

  • You are working with 2 rows at a time. That’s why you made an even number of rows.
  • I labeled the columns to make it easier to understand.
  • Remember: rows go side to side. Columns go up and down, like columns on a building. It’ll get confusing if I don’t make this distinction.
  • Start at the lower LEFT of the whole damn thing. Believe me, it makes a difference. (Yeah, I tried starting on the right – a big mess)
  • At the bottom left corner, Column A and Column B get stitched together. (Stitch explanations come in a minute).
  • Then go up one row, and Column B and Column C get stitched together.
  • Go back down one row and Column C and Column D get stitches together.
  • Go up one row and Column D and Column E get stitched together.
  • Go back down one row and Column E and Column F get stitched together
  • And so on, and so on, until you finish those 2 rows.
  • Here’s a little visual I threw together:

The Stitches

  • Bring your thread up from the bottom on the leftish to middle part of the top of A. In this case, A is not at the end.
  • Bring your needle around the other side of B and push it through both A and B.
  • Do that one more time. Bring the needle around to the other side of B and go through B and A.
  • Now bring the needle around again, but this time slip the needle into B only. You are going to run the needle up B to the row on top of it. BUT you are doing this under the cloth.
  • Now you are going to do to B and C what you just did to A and B.
  • And then come back down C to the first row.
  • Now repeat with C and D. And then with D and E. And so on.

When you get to the end of the row:

  • Connect the last two together and then tie your thread off underneath.
  • Ignore the thread in the middle, it’s just a loose thread that got into the frame.

Starting a New Row

  • Whatever you do, do NOT, I mean do NOT, just move on up to Row 3 and think you’re going to just work your way back to the left.
  • It does NOT work that way. Yeah, I learned that the hard way too.
  • Go back to the beginning of Row 3 all the way on the left.
  • The pattern for Rows 3 & 4 is the same as for Rows 1 & 2
  • Repeat again for Rows 5 & 6, and then 7 & 8.
  • Keep doing it until you finish

Progression

All Done, At Least with the Smocking

  • After the first two or three, I grew tired of having to tie off the loose threads in the back. The pleats are still fairly tight, and that made it a little more difficult.
  • Once I was done with the smocking, I took out the gathering stitches.
  • Loosened the pleats.
  • Then I tied down all of the loose threads.
  • Front view

  • Back side

All that was left was to hem it and add the apron ties and waistband.

Do I like it?  Yes, I think it is beautiful.

Can I improve on my techniques? Absolutely! Even looking back through the pictures I saw a couple of things I can do better on next time. All-in-all, smocking can be fun!

Making the 16th Century Flemish Working Class Woman’s Gown Part 2: The Construction

It’s been a month since I’ve posted anything about  my 16th century Flemish costume. Where did I leave off? Ah, the dress. On to the construction.

This is a continuation of a series of posts I’m writing on my construction of a 16th century outfit, which would have been worn by a working class woman of Flanders. I wrote about my analysis of the gown in the last post in this series: https://maniacalmedievalist.wordpress.com/2012/10/17/making-the-16th-century-flemish-working-class-womans-gown-part-1-the-documentation/

Most of my construction was based off of Kass McGann’s ideas posted in Reconstructing History: http://www.reconstructinghistory.com/blog/the-netherlandish-working-womans-outfit-part-1.html

When it comes to 16th century Dutch dress, there are two main theorists. Kass is one. The other is Drea Leed: http://www.elizabethancostume.net/lowerclass/makeflem.html . It’s not that I disagree with Drea. I felt that Kass’s ideas would result more in the look I wanted to achieve than Drea’s.  The look I want comes mainly from the paintings by Joachim Beuckelaer and Pieter Aertsen, two 16th centruy painters who mainly worked out of Antwerp.

If you go to Kass’s part two in her Netherlandish Working Woman’s Outfit ( http://www.reconstructinghistory.com/blog/the-netherlandish-working-womans-outfit-part-2.html ), she gives fairly straight forward instructions on creating the bodice part of the gown.

I started out with two squares of my linen. I sewed them together to give the bodice extra strength when lacing.

Using my modern awl, I made the holes for the eyelets. I really do need to get a more period awl.

I laced the square of fabric around the mid-section of my dress dummy.

To prepare for making an armhole, I made a slit from the top of square, where it hit my shoulders, down to about armpit level.

I squared off the hole in order to get to the shoulder seams.

The square I used was way too long. I ended up wasting a good bit of fabric at the top. If I make something like this again, I’ll figure out how to use measurements to get a more accurate piece of fabric.

I sewed up the shoulder seam a bit at a time until it fit fairly snug.

detail from Christ in the House of Martha and Mary
Joachim Beuckelaer

The pieces of the skirt are pretty geometric.

At this point, I had not had as much experience making pleats, so I first tried box pleats.

Flight into Egypt, detail
Joachim Beuckelaer

The rear ends of the women in these paintings are awfully large, but I couldn’t justify using a bum-roll. Why would a working class woman wear a bum-roll? My guess is that the look was achieved with pleatings. Box pleats, however, did not work.

So I tried cartridge pleats. I’m not unhappy with the pleats, but I still need to go back an re-attach them. My method of attaching them to the bodice part flattened them out a good bit more than I wanted.

Overall, I’m happy with it. I achieved the look I wanted, minus a few minor errors. I did, however, learn quite a bit.

Beginning to Smock

I take back all the bad things I said about cartridge pleating and blackwork counted stitch embroidery. Smocking! That’s the real pain in the tush!

It’s for the decorative apron I’m making for my Christmas Revel A&S entry. It’s a project for which I have the documentation. It’s not so big that it’ll take months and months to complete, but it has a degree of complexity.

Yesterday, I looked over the documentation. The pleating part looks like cartridge pleats but on a larger scale. I figured that since I know how to do cartridge pleats, this should be no problem. Wrong! My problem is that it is so much larger and getting the pleating marks even is not easy.

At first I berated myself and told myself that I must be daft if I can not figure out how to do this. That was after I spent 5 hours doing this:

Ignore the squiggly on the side; it’s part of an abandoned project. As you can see, the dots are no where near even. At first I was trying to use the edge to make the dots line up. I gave up on that and drew a base-line to use. Still, even with my fancy ruler they would not line up. Plus I was making the dots 1/2″ apart, and after thinking about it (and 5 hours of cursing) I wanted them closer together.

It really didn’t help that I was doing this on my lap, using a large cookbook as a table. I was kind of in the middle of a Psych marathon with my 14 year old and didn’t want to get up.

So, I gave up on this end. I turned the linen piece around and made a straight edge by pulling threads out and cutting along the missing thread line:

The dots may be hard to see from the faintness, but they are much straighter. I used my favorite ruler that let me see through to match up the now straight fabric edge to the measuring lines. It’s not perfect, but it’s not bad. It still took over 4 hours to do (and I’m not quite done yet).

All of this work left me a little anxious to get into the actual smocking, but I realized that I was still unclear about some of the details.

Sometimes before you can learn something new, you need to figure out what not only what things are called, but what questions you need to ask. So I needed to hit the books again and do a bit more research.

My first question was how do you get the pleats (and/or) dots even without going insane.  Turns out that it’s not that easy. My having problems with it wasn’t unusual. In fact they make specific tools just  for getting the dots even when smocking, such as iron-on smocking dots and dot templates. They also make machines that do nothing but make the pleats for smocking. Wow! So I’m not such a nutter-head for having a difficult time doing this.

I got some tips and thought of a couple of creative ways on my own to make the dots even and less time consuming. More on that later.

Then I started asking other questions:

When making the pleats, does it matter if I work from left to right and from top to bottom?

With the dots, do I go up one hole and down the next? Or do I go down slightly to one side of the hole and up slightly to the other side (or vice/versa)?

What about needle angle? Should it always be perpendicular to the fabric? Or can I use a running stitch?

And the type of needle. After it’s pleated what kind of needle do I use to smock? Long or short? Sharp or ball-point?

I found out some of the answers, and the rest I figure I will learn by trail and error.

So I put my nice linen down, cut a piece of cotton muslin and decided that it’s mock-up time. What will I use my mock-ups for? Casual wear. My girls could wear them. Or I just may give one out as a door prize when I teach a class on this stuff.

One things I did discover is that there are very little tutorials on-line on smocking from the beginning to the end of a project.  So I plan on making one. A smocking for dummies tutorial. That will come much later after I’ve learned it myself.

It may seem like I flit about from one project to another, not finishing any – or at least that’s what my husband thinks. But I’m not.

Side-laced cotte update:

  • Washed the fabric yesterday
  • Have one or two more dying test batches to try out before deciding on a color
  • Should be dying the fabric tomorrow

Blackwork Coif:

  • Still working on my needle-case in order to learn counted stitch blackwork embroidery.
  • Have the flowers and patterns picked out for the coif
  • The scroll-work design has been transferred to the linen I’ll be using.
  • I still have to decide on  exact placement and sketch it out, but I’ll do that after my needle-case is done.

Off to sew!

Christmas Revel Prep

I’ve felt run down for the last few days, but I was hoping it was just a low iron week. I added my vitamins back to my daily regimen in hopes that would I feel better, but I’m still tired. This morning I woke up coughing. At least with the vitamin increase, I should be able to fight off this bad boy a bit faster than normal. I’ll just cure it with some hot toddies. Ooo, and I have a grog mix I’ve been wanting to try.  I do have to run out to get the Thanksgiving turkey today, but after than it’s bed for me.

The realization that I will not get done with my blackwork Elizabethan coif in time to enter it into Christmas Revel’s A&S has hit me. Counted stitch blackwork is very, very slow. I’m not even half done with my needle-case cover, and all I’ve done on the coif is planned and sketched it.

So, I spent part of last night looking through the documentation I’ve gathered for projects that I haven’t yet made, and I decided on the pleat-work embroidered apron.  Since my next non-A&S compliant project is the side-laced cotte (I’m just going to  machine-sew it), I want something to bling it up. Not much jewelry was worn in the age of cotehardies. By the time they introduced waist-lines, even the girdle was not tremendously popular. However, in a few manuscripts and woodcut prints you see a very fancy apron.

It’s white, although I have seen a couple of other colors, and it’s most probably linen.  Along the top, normally gathered edge, you see pleat-work, sometimes plain and sometimes with embroidery on top of it. It looks very much like smocking in some of the pictures. I’ve never done smocking (I’m a virgin smocker), but it looks suspiciously like cartridge pleats – rows of evenly spaced gathering stitches.

This apron is seen from the early  14th to the mid 16th centuries. So I can wear it with my cotes or my late period Flemish garb, which makes it a pretty versatile accessory. Here are a few examples.

14th Century Pleatwork Apron

Early 14th Century
Brown pleat-work apron with white edging

Early 15th Century


Mid 16th Century

Now to figure out the how, and hopefully later tonight I’ll start the pleating.


More 16th Century Blackwork Fill-in Pattern Analysis

Oh my, I haven’t posted in a few days. It’s nearly Halloween – my favorite time of year. I’ve been, among other things, having fun with the kids. We were invited to one of their teen friend’s Halloween themed birthday party, and so I decided it would be the perfect occasion to go as something really scary. Unfortunately, I didn’t count on a side-trip to Walmart  for the friend I was riding with to pick something up. Let’s just sum it up and say that children screamed, I felt bad, and you may see me on the People of Walmart page.


Now on to the other fun stuff.

I’ve been continuing work on my needle case. It’s slow going, but my repeats are more consistent and I am picking up a bit of speed.

Blackwork Needle-case as of 10-21

The ruler should give some perspective on the size. Each repeat is about 1 cm by 1 cm. That’s a-lot of tiny stitches. It’s based off a pattern I analyzed here: https://maniacalmedievalist.wordpress.com/2012/10/11/analyzing-and-recreating-blackwork-fill-in-patterns/

I’ve also been analyzing other blackwork fill-in patterns from 16th century pieces. I have two more from the same piece as pattern #1 (see needle-case above). It’s an English 16th century pillow-cover  from the Falkland Collection at  Victoria & Albert Museum http://collections.vam.ac.uk/item/O317803/pillow-cover.

16th century pillow-cover from the Falkland Collection at Victoria & Albert Museum.

This little piece here:

16th Century Blackwork Fill-i9n Pattern 2

can be done in either direction.  It’s a really easy pattern, but the simplicity doesn’t mean that it isn’t very nice when used. It reminds me of seeds on a strawberry. The pattern itself is simple to recreate – alternating dashes.

Blackwork Fill-in Pattern #2

My third fill-in pattern is the last one from the same pillow-cover. It’s more complex than the one above, but it’s still fairly simple – diamonds and stars.

16th Century Blackwork Fill-in Pattern #3

My analysis may have an error, but I like it my way. If you look near the upper right corner, you can see that the diamond has a vertical line going through it connecting the center to the stars above and below, but I like it better with the space open.

16th Century Blackwork Fill-in Pattern #3

I’m hoping to finish up my the embroidery on my needlecase this week. I clamor about the time it is taking, but I need to realize that it’s not the project I’m working on but learning the art. Learning a new art does take time.

Making the 16th Century Flemish Working Class Woman’s Gown Part 1: The Documentation

This gown or overgown was worn as the outer most piece of full body clothing in the 1540’s to 1560’s by working class Flemish women in Antwerp, the largest city of Flanders at the time. This first note of two will describe the features of this specific type of 16th century Flemish gown. Since no extant gown from this place, time and social class exists (as far as we know), I’m mainly using paintings done by two artists who painted many portraits of Antwerp’s working class. Pieter Aertsen’s and Joachim Beuckelaer’s paintings captured so many aspects of the working class’s life. Through these, we can glimpse the everyday activities of a class of people that are rarely noticed.

My second note in this series will focus on how I made my version of the gown.

On left: Pieter Aertsen, Cook in Front of the Stove
On right: My gown

Let’s start with the top of the gown and work our way down.

Straps

  • Seam on shoulder nearer the back than the front
  • Loose fitting: the outside edges are not necessarily form fitting

Bodice

  • Possibly constructed using a solid piece of fabric and cutting the armhole out of the top middle. No side or back seams present.
  • Inside edge skirts the outside of the breasts adding some support to the bosom
    • Joachim Beuckelaer’s “Christ in the House of Martha and Mary”

  • Tapers inward on the laced part
    •  Joachim Beuckelaer’s “Christ in the House of Martha and Mary” – above
    • Pierter Aersten’s “Vegetable Vendor”

  • Laced edges do not meet & are laced together using metal or fabric loops
    • Pierter Aersten’s “Vegetable Vendor” – above
    • Joachim Beuckelaer “Allegory of Negligence” – above
  • Spiral laced
    • Joachim Beuckelaer “Allegory of Negligence” – Above
    • A great tutorial on spiral lacing is Jen Thompson’s The Zen of Spiral Lacing

Under the Apron

  • What goes on under the apron is less evident.
  • Looking at details from Hieronymus Francken’s “The Witches’ Kitchen.”
    • The front opening seems to be open down past the navel, almost to the groin. Yet it only has lacings for the area from the waist to the top.  You can also see this in Johann Theodore de Bry’s illustration.
    • by Johann Theodore de Bry

    • Hieronymus Francken’s “The Witches’ Kitchen.”


Skirt

  • Gathered in the back with large, loose pleats
    • Bueckelaer’s “Flight into Egypt”

    • Pieter Aersten’s “Cook in Front of the Stove”

And that is all.

Coming soon . . . How I Made My Gown

Analyzing and Recreating Blackwork Fill-In Patterns . . .

. . . are not easy!!!!

I’m working on 3 blackwork projects simultaneously. Or, more correctly, I am starting 3 blackwork projects simultaneously. It sounds like I have another case of “biting off more than I can chew,” but it’s not as insane as it seems and  actually makes a bit of sense.

The projects I’m working on are:

  1. Late 16th century English blackwork coif
  2. Blackwork cuffs, for an English chemise, using a counted stitch pattern, probably similar to Jane Seymour’s cuffs
  3. Late 16th century blackwork sampler, trying to incorporate a good diversity of stitches actually used

Right now, I’m in the research and documentation phase. Since all 3 projects overlap to some degree, I generally keep all three files open and go from one to the other as needed. I am planning to focus on one at a time when I’m in the creation phase of the projects.

Mostly, I had been working on my sampler research. I’ve reached a pause in that project since I need to decide whether or not to focus on the English sampler, of which there is more published research, or focus on the one Italian sampler that I really like but has nearly nothing published on it. The smart choice is the English, but since I’m still resisting it, I’m taking a break.

Switching gears, I’m heading back to my coif project. It’s a project I started back in June, but I haven’t made much headway on. Most of the problem is that I can’t decide what decorative pattern to use. Finally, I chose a pattern that took my fancy and I’m just going forward with it, no take-backs.

This is the coif design I’m basing my coif off of:

Late 16th Century English Coif

A basic hourglass shaped coif with bobbin lace edges, free-hand flowers, insects and leaves and scrolling vines. The vines and lace I’m keeping, but I’m using designs for the flowers, leaves and insects that come from other blackwork pieces from that time. I am, however, sticking with the idea of filling the flowers, leaves and insects with different counted stitch patterns. These will come from this coif and other blackwork pieces contemporary to the coif.

My first attempt at analyzing a fill-in pattern

I collected a few hi-res pics of fill-in patterns.

From a 16thC English pillow cover

After several attempts of freehand drawing the pattern (on graph paper, of course), I decided that a systematic approach was better.  This pattern has 3 main figures:

  1. The four-leaf flower
  2. “Snowflake” pattern
  3. Small geometric shapes that connect the flowers

One at a time, I isolated and analyzed each type of figure. There are quite a few dots left where stitches used to be. These dots help me figure out the grid of the pattern. First horizontally:

Flower from upper right corner

Then vertically:

Same upper right flower

The once seemingly curved, indistinguishable form now starts to look like a pattern of connected straight lines:

Same flower

I compared this plotted flower to the other ones on this piece (4 pictures above this one) to see if there are any discrepancies that would make my design flawed. I couldn’t find any, but if anyone sees them, please let me know. I repeated this process with the snowflake and the small geometric shape. My final pattern came out to be this:

My interpretation of the above pattern

I think, I think, I think that this is correct, but never having done this before, I feel like I’m missing something. Even if I am, I’m pretty happy with this fill-in pattern. It’s very pretty. Now on to the next fill-in designs, and then to start picking the actual flowers and plotting the coif! Exciting stuff!!!