Russian Goldwork Embroidery Design from 12th c. Suzdal collar

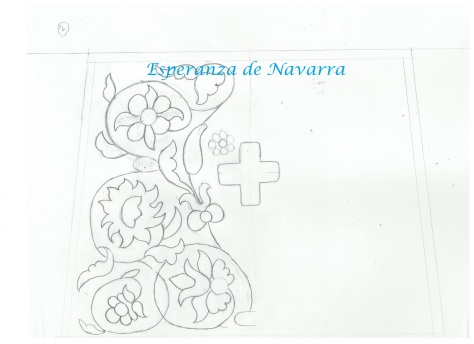
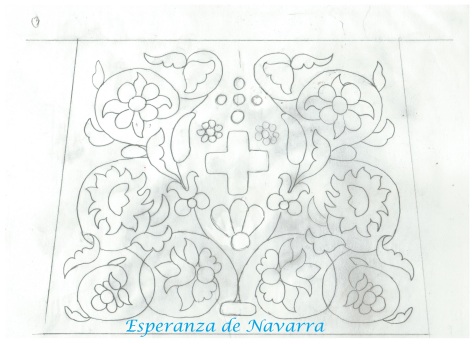
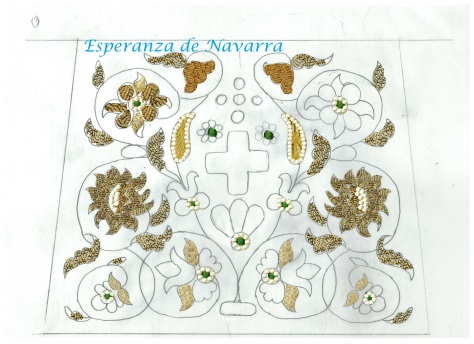
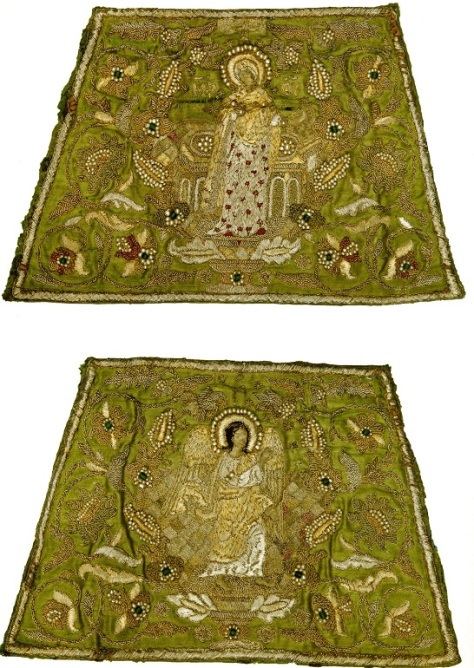
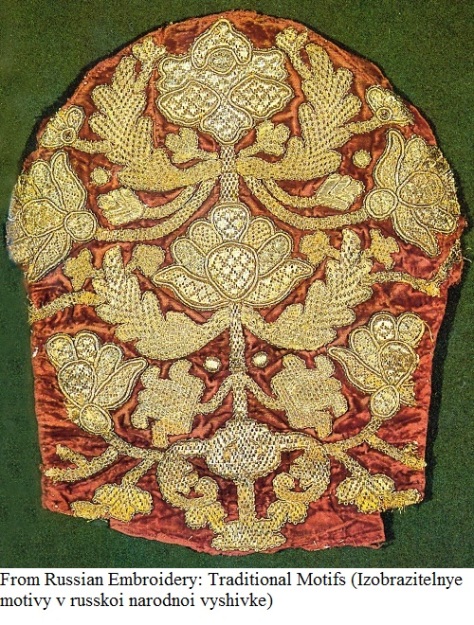
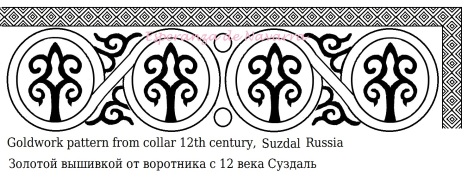
I’ve been working on ideas for my elevation gown, and of course it must have Russian goldwork on it. The underdress will have embroidered collar and cuffs, and I’m using a pattern found on a 12th century collar from Suzdal.

It’s a design I’ve sketched out a couple of times, both a simplified version and one closer to the extant piece. Like many early Russian patterns, it incorrporates 2 of my favorite motifs: the tree of life and the simple scrollwork.

In case anyone else is feeling inspired to do some Russian goldwork, I wanted to share my sketch. It’s a little cleaned up using the computer, but it should work well.

Esperanza sudzal collar 12th c.jpg

Happy Sewing!

Russian Cuffs – entry 2

Reality strikes home when admit that there are days, sometimes in a row, when I do not touch my computer! 🙂 Seriously! So, how can I blog everyday if I am not on-line?

The truth is that I can not. So instead of beating myself up for instantly flunking my own challenge, I will rework it. 10 blogs in the next month. More realistic for someone who can spend more than one day at a time in the sewing room and loving every minute of it!

Enough of that – now on to the cuffs.

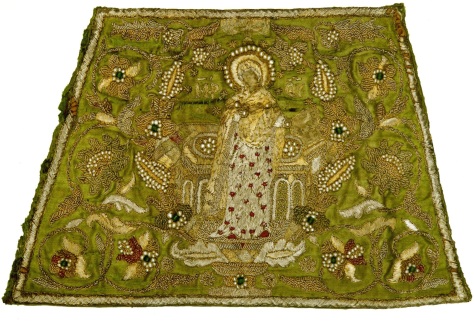
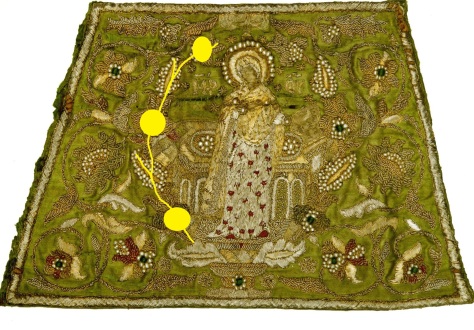
To recap, my next project is to use all of the skills I learned this last year in Ubrus to make a pair of 16th century Russian cuffs. Here’s one:

Pic: “Благовещение.” Иконография восточно-христианского искусства. Web. 13 Apr. 2017

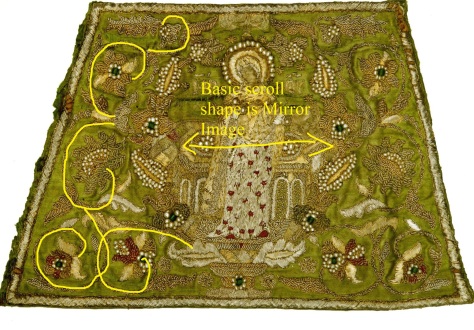
Last time, I worked on analyzing the design pattern. Jelena, my Ubrus art teacher, has spent the last few months teaching us to recognize and analyze the traditional scrollwork on period Russian art. We’ll see this pattern over and over again in Russian embroidery. The symmetry of the curls can change into different patterns, but once you start to look for them, seeing the scrolls helps to pick apart the repeats and re-create what, at first, looks really complicated.

To begin to make your own transfer, you need to make some choices. My arms are smaller than whoever wore the original cuffs. Do I shrink the elements or cut some out? I like to keep the feel as close as I can. As odd as it sounds, taking elements out keeps my work feeling closer to the original than shrinking it. One big reason is that I can not shrink the material I’m going to use. The kanitel (gold and silver purl) only comes in so many sizes.

First thing I do is to sketch the figure out on my cuffs dimensions and get as much onto something that will fit me.

After drawing out the size of my cuffs, I roughly sketch the scrolls onto an actual sized mock-up. Looking at the original, both sides are mirror. That means I only have to really sketch out one side and then flip it.

Taking out the middle figure gives me space to keep most of the flowers. Yay! It’s the flowers I really like. Once I get a good sketch for a transfer, I can use my cheats, aka tracing paper, to make the other side.

Please forgive the pencil smudges. 😉

I get asked a-lot if you can use my images for your work. Please do!! I want making art easier on all of us. If using something I sketched helps you, please do! The only thing I request (not demand) is that you share your work with me. That’s only because I love seeing what you guys are up to.

Sketching out my design was fun, but how will it looks when I start to fill it? Curiosity got the better of me, so I used some copying and pasting to give me glimpse of what it will look like.

I spent more time than I want to admit pasting texture into my sketch, but I like what it’s going to look like!

I’m trying hard not to spend more than 30 minutes or so on each blog. That way I don’t obsess over my writing and spend more time on the art. Today I want to transfer my patter to the green silk and pick through my supplies to see if I have enough. I may, if I’m ambitious, make my own green glass beads to use on this. A bonus is that torch-work makes my neck pain better.

TTFN!!!

Esperanza de Navarra

New Project: Cuffs, entry 1

After falling in love with Russian goldwork embroidery, I want to make something to really show off the art style itself. I want it to be something I can wear – after all, clothing is the best place to show others new ideas. I’m thinking cuffs since it doesn’t need to be washed and, unlike collars, they are not attached to the clothing at all. Plus it’s something I can wear with multiple dresses. Perfect!

After looking at many period cuffs, I found one I’m going to base mine one, but with some changes. Most of the cuffs have saints or religious figures in the center, after all, they are made for the church. I want something more ornamental, but still period – perhaps a cross.

The main piece for my inspiration is “The Annunciation,” a 16th century piece currently found in the Museum of the Monastery of Putin. It’s embroidered with gold thread, silver thread, silk and gold and silver kanitel. It also has pearls all over it and a few glass or gemstone beads. The base is a light green silk, and I have a perfect piece of fabric to use.

Pic: “Благовещение.” Иконография восточно-христианского искусства. Web. 13 Apr. 2017

I have the details. Now to sketch out the design.

Basic art style: Most of these cuff fall into 3 basic design types. All 3 types have a central figure or figures, usually saints, but sometimes a geometric shape, such as a cross. Two of the types are bordered by archways. I’m not doing those, so I’m not going to get into the specifics (trying really hard not to get off track). The third type has a central element surrounded by vegetative scrollwork. This is my type!

I’m going to take the basic principle of the layout, but change up some of the flowers and leaves. Everything needs to stay consistent with the time period and art style. Let’s take a look at the style.

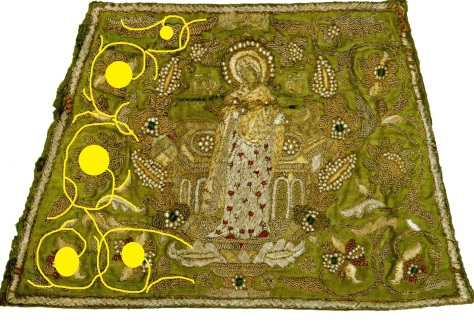
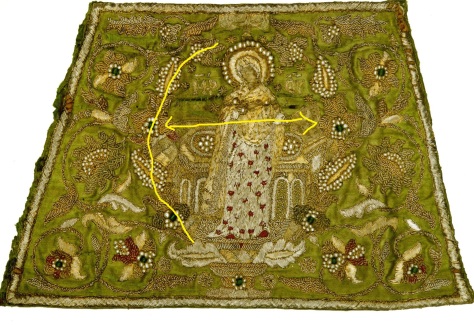
The scrollwork shape is mirrored on the left and right. It can be divided up into two separate scroll sets. The first is more loopy and curves around the outside. Above you can see the basic shape of the curls.

Here’s the curls with the flowers and leaves added in. Once you get the basic design, the rest is just dressing. The second is simpler and surrounds the central figure.

It is also mirrored and left and right sides.

Here it is with the flowers and leaves added in. The basic shape of the scrollwork is more important than the flowers and leaves. Once you get the basic shape of the design, you can pick and choose the ornaments.

Both stem from a base that is under the central figure. The left and the right cuffs (I don’t know which is which) have the same basic scroll patterns even though the flowers are different.

I like this scroll design! I’ve seen several that are similar in other Russian goldwork pieces and in many other pieces of Russian art from the same time period. None are exactly alike, but the elements seem universal. I’m going to use this basic design.

Now to find flowers and leaves!!

I’ll be sketching some rough shapes out and will hopefully have some progress to show tomorrow.

Until then, do some art! 🙂

Esperanza de Navarra

My Tedious Art

I am not an artist, but I have always wanted to be one. Since I was little, making beautiful things has been one of my life goals. Art does not come easy to me. As a child, my doodles did not look much different from random scratches on a paper.

When I started classes with Ubrus, 1/3 of our lessons was art, specifically in drawing. “Ugh!” I thought. This is where my amazing lack of natural skill and talent is going to show itself. However, I underestimated Jelena, our art teacher.

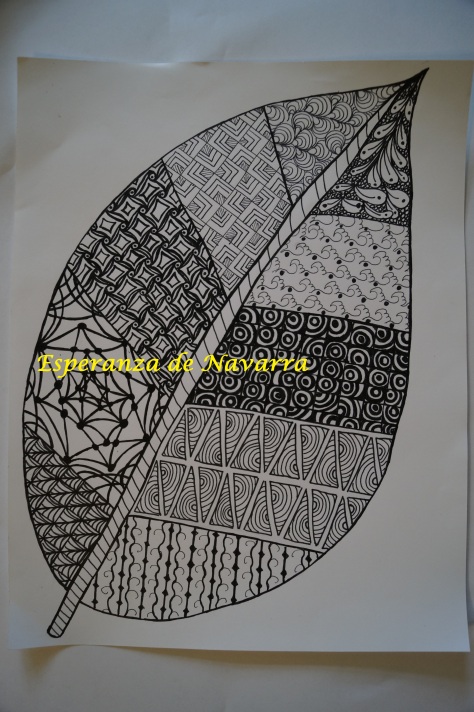
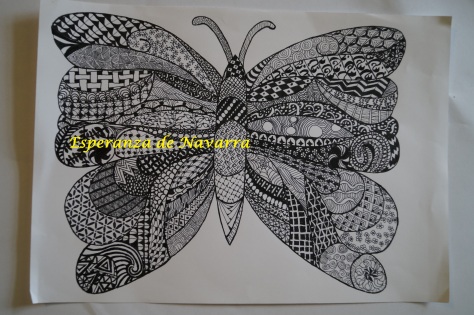
For the first few weeks, we did intuitive drawing. Popularly called zen doodling now, it is a way to free your mind of preconceived notions about drawing. We learned to take simple shapes and build on them to create texture in our drawings.

I started to look at everything as a potential for a design. As I look around my room now, from the texture patterns on my walls to the way the doorknob looks from this angle can all be turned into a doodle pattern. Although I had seen books at the grocery check-out on this type of drawing, I did not know how truly fun and liberating it could be.

One of the first concepts I had to rid my mind of was “originality.” I find myself often striving to create something completely unique that I frighten myself and end up not creating anything. With our intuitive drawing exercises, we were encouraged to look up the many patterns others have created. Putting pencil or pen to paper was more important than coming up with our own design.

At first I thought we were encouraged mainly to get us to do something. Doing something is better than doing nothing. As I learned more about Russian art, I came to realize that their artwork, then and now, is steeped in tradition. The difficulty is to perfect your ability to do the craft, not to create new approaches. Such a simple thought can change so many other thoughts.

The more I drew, the easier and better it became. I began to see that my lack of natural skill did not matter. Maybe I will never be a famous artist, but who cares! I was having fun and making pretty things – my lifelong goal.

Yes, my work was still sloppy, but if I could see myself improving in such a short time, then I knew that I COULD improve.

It was then, while browsing through pictures of Russian goldwork, that I saw something that made the intuitive drawings even more relevant – the fill-in of the goldwork. Traditional Russian goldwork is not flat. Going back centuries, we can see the same patterns that fill in our doodling designs in the gold thread.

Amazing, isn’t it!

I encourage everyone to pick up pencil and paper and try this method of intuitive drawing. Only by learning to see the curves and patterns and shapes of the world around us can we improve the way we create art.

Go out and draw something!!
Esperanza de Navarra

Rus Embroidery #4

I’ve been having fun sketching Viking Rus embroidery designs from period sources.  Their artwork, as I may have said before, is this amazing mix of Viking, Byzantine and Eastern.  I’m still researching on the stitches they used, but I haven’t yet found enough to post anything.

Here’s a new design. It’s based on a sword hilt from 11th century Ukraine.

Neckline / collar

rus embroidery 5 d wm


Hem, Sleeves and other Straights

Rus Embroidery 5 f wm

Documentation

rus embroidery 5 wm

Rus Embroidery #3

Between 2 days of homeschool co-op and one of my best friends getting married, it’s been a busy couple of days.  I’m just posting a new Rus Viking embroidery design based off of an 11th/12th century piece of Rus embroidery.   Documentation to the piece will come later.  Enjoy!

rus embroidery 4 whole wm

Viking Design for use in Embroidery

I’m still working on research on Rus sewing techniques and embroidery methods, especially those not gilt or bead.  From what I’ve learned, it is different from the contemporary techniques we’ve found in western Scandinavian lands. Not sure if I would call it more complex, but it certainly has a level of complexity I did not expect to find in 10th and 11th century textiles.

Until I can gather my notes into more writing, I’m still working on my Viking and Rus designs for use in embroidery.  You know how I love the combination of curves and geometric figures.  This one is inspired by a pattern Sue Margeson’s book on “The Vikings in Norfolk.”

viking in Norfolk

Rus Embroidery #2

I have insomnia. It’s been getting worse for years, and it’s more normal than a full night’s sleep.  Partly why I research so much is that it passes the long nights.  Once every few weeks I crash and that always happens at the most importune times, like when I get a chance to hang out with my besties at a birthday party.

It also leaves me pretty empty to post on my blog, even if I have another Rus embroidery pattern ready to go.

For a few months, I’ve been fascinated by the Russians. I’m in touch with several Russian Viking-reenactment groups, and they are so cool!  Two distinct difference, other than that they battle each other with real swords and no face plate, jump out at me.  First, they are serious about their authenticity in costuming.

I’m not an authenticity enforcer.  The only time I inspect someone else’s garb for authenticity is either when they ask directly or I’m judging garb at an Arts & Sciences event.  I hold myself to the rules of authenticity because I find it challenging, fascinating and a personal goal.  I do not go around casting aspersions on others.

Not that the Russian reenactors  are authenticity enforcers either, but they hold themselves to those same standards I aim for.

The second difference is that they share documentation.  Not that I am criticizing my fellow artisans of the Known Realm, but there is a tendency to hoard knowledge that I do not like.  It is not that one has the information that makes them special; it is putting that information in practice and, even more importantly, inspiring others to do the same that makes one truly extraordinary.  I strive to be that kind of an extraordinary artist.

Rus Embroidery #2

This design is based off of an embroidered cuff found in a Viking-age dig in the city of Sharhorod.  I put the pertinent data in the picture so that you can use it for documentation.  Please give me credit for the design if you do.  It makes me happy to know that someone used my work, and if anyone has questions, they can direct them my way.

The first design if for a neckline.  I love, love, lurv embroidered necklines.  Enlarge the picture until it fits your neck. It might be easier to do on a xeroz rather than a printer since it will take paper larger than the A4 size.hem sharhorod 2 wm

The second design looks more like the original and can be used for cuffs or hemlines.  It also gives you a contrast to the neckline design so that you can see how I changed the design to fit the curves.

hem sharhorod 1 wm

I’m already working on a Rus design that has both Celtic-like knotwork and fleur de lis, two of my favorite design elements!

Pleated Embroidered (Smocked) Apron: Mock-Up #1

First, I finally got the fabric I’m going to use for the side-laced cotte dyed!!

Freshly Dyed Fabric

I love the color! I was thinking it would be a bit more blue-ish, but I am pleasantly surprised by the results. I put it next to my white muslin for comparison.

I ended up using Dharma’s fiber reactive procion colors:

One part #30A Emerald Green

One part #32A Electric Blue

And 3/4 part #46 Brilliant Blue

On to the Pleated Apron

My first mock-up of the embroidered pleated apron is done!  It’s a style of aprons that popped up around the mid 14th century and lasted until the late 16th century without changing much in style. I found a couple of new pictures demonstrating the over 200 year range of this accoutrement.

Luttrell Psalter
1320 – 1340 England

Detail from The Seamstress
Edward Schoen 1535

What I like, other than the bling quality, is that it makes the simple apron not so simple and allows it to be worn with fancier garb.

Last time I left off, I was having problems simply getting the dots straight. Here’s what I worked out.

That green thing in the upper right is a home-made Bat-a-rang I made for my son’s birthday party 3 years ago. I still find those things everywhere!

I made a perfect rectangle of a piece of cotton muslin by pulling threads. Here’s a quick and dirty tutorial on it: http://www.sewing.org/files/guidelines/4_204_straightening_fabric_grain.pdf

I squared the edges on my large fabric cutting board and used the marks to make a line nearly across the entire apron every half inch.  Half an inch was too big on one of my previous attempts, but with the method I’m trying, it’s perfect.

Keeping the fabric still lined up on the mat, I marked every 1/2″ in the perpendicular direction. The fabric did slip quite a bit, so generally between each row I would re-straighten it on the mat. It doesn’t matter how many rows you make, but it needs to be an even number (we’ll get to that later).

At this point, I have eight long lines going across, and about 70 dashes going up and down.

Somewhere I read a tip that said do all of the gathering stitches at once. So I threaded 8 needles – I used sharp, medium length embroidery needles. I used normal DMC embroidery floss in a light, but not white color. Avoid the urge to use a completely contrasting color, like red. I did that with the cartridge pleats on my partlet, and when I pulled them out, it left red residue in the holes.

The method I used was I ran along the length-way lines. A smidgen before every dash, I pushed the needle through the fabric. Using the same motions used in a running stitch, right after each dash I came back up.

Tie the back ends of the thread together in batches of 2 and 3. It makes it easier to adjust when gathering the fabric.

When you get to the end of your threads, but still have more line to finish . . .

Start pulling the gathers. That’s why you tied the threads off at the other end and why it’s easier to work all 8 rows at once.

When I finished gathering the gathers, I thought that it looked way too small. I knew that I wanted the apron wider than this.

So I set about spreading the folds and trying my hardest to keep the columns straight. Then I laughed and realized that the smocking will loosen the gathers. I re-pulled the threads together, although not as tight as I did at first.

Take a chop-stick, or something like it, and pock into each pocket created by the gathered threads. It is tedious, but when you are done . . .

all of the rows line up nicely, and . . .

the front looks just lovely.

Now for the smocking. It helps if you understand the pattern first before the stitches.

The Pattern

  • You are working with 2 rows at a time. That’s why you made an even number of rows.
  • I labeled the columns to make it easier to understand.
  • Remember: rows go side to side. Columns go up and down, like columns on a building. It’ll get confusing if I don’t make this distinction.
  • Start at the lower LEFT of the whole damn thing. Believe me, it makes a difference. (Yeah, I tried starting on the right – a big mess)
  • At the bottom left corner, Column A and Column B get stitched together. (Stitch explanations come in a minute).
  • Then go up one row, and Column B and Column C get stitched together.
  • Go back down one row and Column C and Column D get stitches together.
  • Go up one row and Column D and Column E get stitched together.
  • Go back down one row and Column E and Column F get stitched together
  • And so on, and so on, until you finish those 2 rows.
  • Here’s a little visual I threw together:

The Stitches

  • Bring your thread up from the bottom on the leftish to middle part of the top of A. In this case, A is not at the end.
  • Bring your needle around the other side of B and push it through both A and B.
  • Do that one more time. Bring the needle around to the other side of B and go through B and A.
  • Now bring the needle around again, but this time slip the needle into B only. You are going to run the needle up B to the row on top of it. BUT you are doing this under the cloth.
  • Now you are going to do to B and C what you just did to A and B.
  • And then come back down C to the first row.
  • Now repeat with C and D. And then with D and E. And so on.

When you get to the end of the row:

  • Connect the last two together and then tie your thread off underneath.
  • Ignore the thread in the middle, it’s just a loose thread that got into the frame.

Starting a New Row

  • Whatever you do, do NOT, I mean do NOT, just move on up to Row 3 and think you’re going to just work your way back to the left.
  • It does NOT work that way. Yeah, I learned that the hard way too.
  • Go back to the beginning of Row 3 all the way on the left.
  • The pattern for Rows 3 & 4 is the same as for Rows 1 & 2
  • Repeat again for Rows 5 & 6, and then 7 & 8.
  • Keep doing it until you finish

Progression

All Done, At Least with the Smocking

  • After the first two or three, I grew tired of having to tie off the loose threads in the back. The pleats are still fairly tight, and that made it a little more difficult.
  • Once I was done with the smocking, I took out the gathering stitches.
  • Loosened the pleats.
  • Then I tied down all of the loose threads.
  • Front view

  • Back side

All that was left was to hem it and add the apron ties and waistband.

Do I like it?  Yes, I think it is beautiful.

Can I improve on my techniques? Absolutely! Even looking back through the pictures I saw a couple of things I can do better on next time. All-in-all, smocking can be fun!
Beginning to Smock

I take back all the bad things I said about cartridge pleating and blackwork counted stitch embroidery. Smocking! That’s the real pain in the tush!

It’s for the decorative apron I’m making for my Christmas Revel A&S entry. It’s a project for which I have the documentation. It’s not so big that it’ll take months and months to complete, but it has a degree of complexity.

Yesterday, I looked over the documentation. The pleating part looks like cartridge pleats but on a larger scale. I figured that since I know how to do cartridge pleats, this should be no problem. Wrong! My problem is that it is so much larger and getting the pleating marks even is not easy.

At first I berated myself and told myself that I must be daft if I can not figure out how to do this. That was after I spent 5 hours doing this:

Ignore the squiggly on the side; it’s part of an abandoned project. As you can see, the dots are no where near even. At first I was trying to use the edge to make the dots line up. I gave up on that and drew a base-line to use. Still, even with my fancy ruler they would not line up. Plus I was making the dots 1/2″ apart, and after thinking about it (and 5 hours of cursing) I wanted them closer together.

It really didn’t help that I was doing this on my lap, using a large cookbook as a table. I was kind of in the middle of a Psych marathon with my 14 year old and didn’t want to get up.

So, I gave up on this end. I turned the linen piece around and made a straight edge by pulling threads out and cutting along the missing thread line:

The dots may be hard to see from the faintness, but they are much straighter. I used my favorite ruler that let me see through to match up the now straight fabric edge to the measuring lines. It’s not perfect, but it’s not bad. It still took over 4 hours to do (and I’m not quite done yet).

All of this work left me a little anxious to get into the actual smocking, but I realized that I was still unclear about some of the details.

Sometimes before you can learn something new, you need to figure out what not only what things are called, but what questions you need to ask. So I needed to hit the books again and do a bit more research.

My first question was how do you get the pleats (and/or) dots even without going insane.  Turns out that it’s not that easy. My having problems with it wasn’t unusual. In fact they make specific tools just  for getting the dots even when smocking, such as iron-on smocking dots and dot templates. They also make machines that do nothing but make the pleats for smocking. Wow! So I’m not such a nutter-head for having a difficult time doing this.

I got some tips and thought of a couple of creative ways on my own to make the dots even and less time consuming. More on that later.

Then I started asking other questions:

When making the pleats, does it matter if I work from left to right and from top to bottom?

With the dots, do I go up one hole and down the next? Or do I go down slightly to one side of the hole and up slightly to the other side (or vice/versa)?

What about needle angle? Should it always be perpendicular to the fabric? Or can I use a running stitch?

And the type of needle. After it’s pleated what kind of needle do I use to smock? Long or short? Sharp or ball-point?

I found out some of the answers, and the rest I figure I will learn by trail and error.

So I put my nice linen down, cut a piece of cotton muslin and decided that it’s mock-up time. What will I use my mock-ups for? Casual wear. My girls could wear them. Or I just may give one out as a door prize when I teach a class on this stuff.

One things I did discover is that there are very little tutorials on-line on smocking from the beginning to the end of a project.  So I plan on making one. A smocking for dummies tutorial. That will come much later after I’ve learned it myself.

It may seem like I flit about from one project to another, not finishing any – or at least that’s what my husband thinks. But I’m not.

Side-laced cotte update:

  • Washed the fabric yesterday
  • Have one or two more dying test batches to try out before deciding on a color
  • Should be dying the fabric tomorrow

Blackwork Coif:

  • Still working on my needle-case in order to learn counted stitch blackwork embroidery.
  • Have the flowers and patterns picked out for the coif
  • The scroll-work design has been transferred to the linen I’ll be using.
  • I still have to decide on  exact placement and sketch it out, but I’ll do that after my needle-case is done.

Off to sew!