What do I put my stuff in?

I’ve been obsessed with totes and bags for ages. I have an entire pinterest board ( my pinterest ) ( my pinterest page dedicated to totes) dedicated to nothing but tote-bags! In the SCA, at least in Gleann Abhann, I don’t see much of a practical bag in use, other than the “man-bag” that many a dude will carry court time refreshments in.

Bags are so useful! The bags I’m talking about are the kind with long thick straps that you can throw over your shoulder and carry a ton of stuff = modern day bo-ho bag. But are they period?

It’s a side adventure, but I want to start looking at useful period bags made of cloth. If you have any pics, post them in the comments. Between all of our combined skills and knowledge, we can bring the bag back to the Middle Ages!!

wink

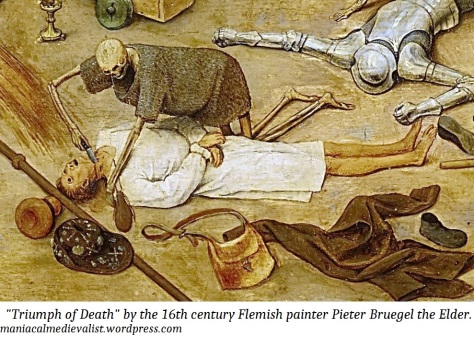
I’ll start. Found this guy in the “Triumph of Death” by the 16th century Flemish painter Pieter Bruegel the Elder. It makes sense. If you are running for your life from a bunch of bloodthirsty skeletons, you really need something practical to stick your stuff in.

To me, I see a nice cloth satchel, almost a “messenger bag,” ​with both and adjustable strap and a buckle flap. How awesome is this?!?!

Off to make some art.

Happy sewing!

Neckline Variations from Period Sources

The holidays always seem to find me ill. This year wasn’t so bad, but I was down with a cold for over a week. I always think I’ll get some online stuff done with I’m convalescing, but I never do. Mostly, I just sleep.

There are only two, maybe three, more installments of the Viking women’s garb, but I’ll get to that another day. This week will mostly be filled with prep for Winter Wonders, possibly one of our only definitely cold events. The boys have outgrown all of their old garb, and so sew, sew and sew some more I must do.

To hold you until I continue on Viking garb, I’ve been working on this little reference sheet for neckline varieties from period sources. I’m sticking to sources before the early 1200’s so that they are suitable for early period garb.

Spread it, pin it, posts on facebook, but above all enjoy it! Belated Happy Holidays!

From Thrift Store to Garb Post 1: A Child’s Viking Tunic

My attitude is that you never should HAVE TO buy new fabric for children’s garb. You can find better and cheaper fabric by looking with a creative eye and an open mind at your local thrift store. At least that’s what I do.

Luckily for me, one of our local thrift shops (America’s Thrift) sorts everything by size. The easiest way to find good, period fabric, such as linen or wool, is to start with the largest sizes and work your way down.

For example, when I made this tunic:

I searched through women’s clothing looking for the largest red linen shirt or skirt I could find. The red linen shirt, I settled on, was made with a very nice lightweight, tight weave linen.  For the contrasting neck and sleeves, I found an off-white linen skirt. I wasn’t using much fabric for the contrast, so any size would have done fine.  Both purchases together cost about $2.50 – I also look for deals even when thrift store shopping.

Little known thrift store tip, many, many people buy linen clothing because it looks great at the store with the sizing still on it. Then they don’t know how to care for the linen and get rid of it. I find countless brand new items of linen clothes all of the time. My entire mundane wardrobe is nearly all linen (I live in southern Louisiana, so do you blame me for wanting to stay cool?).

Once you get home with the item you are going to re-purpose, wash it well in warm water. And dry the heck out of it. Any warping of the fabric or fading of the dyes you want done before you cut it.

The linen shirt I found. I think it was either a 1X or a 2X in size. 100% nice linen.

Now iron it flat. Cut it along the seams into as many large flat pieces you can. Even if those pieces have seams, as long as it can lay flat, leave those seams in.

Blouse cut into flat pieces. There is still a seam running down the back piece, but since it laid flat, I left it.

Now use those pieces to cut the pieces you need for the item you are making.

Pieces for son’s Viking tunic. Reverse the front and back pieces – I confused them when labeling and am too lazy to relabel!

I have a method for patterning tunics using only the person’s measurements. I have an idea that all garb construction can be reduced to mathematical formulas. It’s just an idea right now, but one type of garb at a time I’m working the math out.

My tunic method mostly works. I still need to tweak it a bit in places, but I’ll definitely post my method once I have it just right. I used my method making this tunic, and it fit my son perfectly.

Mostly sewn tunic

After much experience, I found it easier to make the neckline before the sides are sewn up on a tunic.

Neck line basted onto tunic.

Each family member has a basic neck pattern for tunics and such. I make it with craft foam since it’s more durable and flexible than paper.

I also have a mathematical formula for making neck holes. I’m still working on that too.

Another tip, leave the center neck hole in the neck piece while basting it to the garment. It makes it much easier to pin the garment and neck together. Remember, pin the right side of the neck line to the wrong side of the shirt.

Neck hole trimmed

I cut the hole out of the neck. I’ll trim the seams a bit closer to make it fold over easier.

Keyhole neckline turned right side out

Turn the neck line piece so that the right side of it is showing on the right side of the tunic. I then placed a small row of stitches around the hole to stabilize the fabric. These stitches can be removed once you are done with the neck, but I left them on as decorative stitches.

Hemmed and finished.

I added a decorative row of blue stitches and another of white stitches along the edge to tack the hem down.

All that’s left is to sew up the sides.

Before I sew the sides and hem the bottom, if I want to add any embroidery or other embellishments, I do them now. It’s easier to embroider a flat piece than having to stick your hand in and out of a tunic.

finished tunic

Here it is all done. I did a bit of split stitch embroidery on the neck and cuffs to spruce it up.

Besides the embroidery, it took me all-in-all about 2 hours to make the tunic. My little dude loved it, and I’m very happy with it.

Types of Needles and Plans for a Needle Case

During a trip to JoAnn’s Fabrics yesterday, I bought several sizes of tapestry needles. Their blunt ends, I found out, work better with certain types of embroidery, such as blackwork. Since the tips aren’t pointed, they are less likely to pierce a thread.  My discovery was that in any type of counted stitch embroidery (example: 2 threads up and 4 threads to the left), you want your needle to go between the threads of the fabric rather than through a thread. The blunt ends push the threads aside instead of piercing it.

My next step in this journey is to learn what the different types of needles are better for doing. After all, they wouldn’t make different styles, sizes and types if there wasn’t a reason.

A large part of learning something new is discovering the un-obvious and learning those things you never knew mattered, or sometimes never knew existed. It’s not just about mastering those steps that you know of, but learning all those little details, new terminology, and minor bits about which you’ve never heard.  Sometimes it’s the little things, those things that no one thinks to explain because anyone who’s done it for any length of time knows, which I find frustrating. Types of needles are one of them.

When it comes to the basic needle, there are 4 aspects of needles that are important:

  1. Point type
  2. Eye type
  3. Length
  4. Width

Point Types

  1. Sharp
    • As the name implies, they have a sharp point. These are the most common type of hand-sewing needles used.
  2. Ball point
    • Good for knit fabric since it is less likely to snag the threads and un-do the knitted fabric.
      • Ball Point or Knit Needles
  3. Blunt
    • Used for projects where you go between the threads. The blunt point pushes the threads to the side so that it is not pierced.
      • Tapestry needles are blunt

Eye Types

  1. Small Round Eye
    • General sewing needles. Eye is large enough to fit normal sewing thread.
      • Sharps: general purpose sewing. Sharp with small head that is good for working with normal sewing thread.
  2. Long Eye
    • Better for sewing that uses multiple threads, thick threads or yarn.
      • Embroidery or Crewel Needles: have long eye and a sharp point
      • Tapestry Needles: have a long eye but a blunt point. Generally a little on the thicker side. Can pass through fabric without piercing the individual thread. Good for blackwork or other counted stitch sewing.
      • Chenille Needles: Large eye and thick like a tapestry needle, but with a sharp point. Used for going through thick, closely woven fabric with multiple or large thread, like ribbon or wool embroidery.

Lengths

  1. Short
    • Work with tiny details
      • Quilting Needles: short and sharp. Good for small stitches used in quilting or going through thick fabrics that need small stitches, such denim or when hemming pants.
  2. Medium
    • General use. Most things you do can be done with a medium length needle.
  3. Long
    • They are made for hat making, but can also be useful in any circumstance where large basting stitches are needed.
      • Milliner Needles: long and sharp with a small eye. Since the eye is not much bigger than the shaft, it can also be used for beading.

Widths

  1. Thin
    • Light-weight fabrics so that the hole made is tiny and doesn’t affect the fabric much.
  2. Thick
    • In some work, like embroidery, you want the hole in the fabric big enough for the thread to pass through without a problem. Especially with using silk thread, you don’t want the thread to struggle being pulled through.
    • Some needles have a sharp point with a thinner body that tapers up to a larger head, even a diamond or triangular shaped head. These are good for getting through fabric that needs a sharp point and making a large enough opening for the thread to pass easily through.

Now what does all of this have to do with a needle case? Now that I have so many types of needles, I want to use the correct one for the correct circumstance. Thus, I need a way to organize them. Now, if Jo-Ann Fabrics had simply had a decent needle case yesterday, I would not be here. Since they didn’t, my need for a simple needle case has become much more complex. I now want a needle case that organizes my needles by type and size, has a pocket for my embroidery scissors and looks like it could be found in the 14 to 1500’s. It doesn’t have to be historically accurate, but I don’t want it to be glaringly modern.

That’s what I’m working one today. Pictures will follow.