Russian Goldwork Embroidery Design from 12th c. Suzdal collar

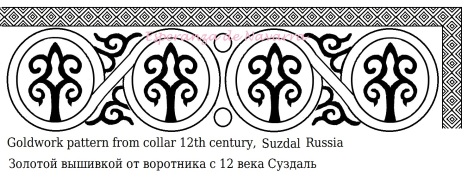
I’ve been working on ideas for my elevation gown, and of course it must have Russian goldwork on it. The underdress will have embroidered collar and cuffs, and I’m using a pattern found on a 12th century collar from Suzdal.

It’s a design I’ve sketched out a couple of times, both a simplified version and one closer to the extant piece. Like many early Russian patterns, it incorrporates 2 of my favorite motifs: the tree of life and the simple scrollwork.

In case anyone else is feeling inspired to do some Russian goldwork, I wanted to share my sketch. It’s a little cleaned up using the computer, but it should work well.

Esperanza sudzal collar 12th c.jpg

Happy Sewing!

Rus Embroidery #3

Between 2 days of homeschool co-op and one of my best friends getting married, it’s been a busy couple of days.  I’m just posting a new Rus Viking embroidery design based off of an 11th/12th century piece of Rus embroidery.   Documentation to the piece will come later.  Enjoy!

rus embroidery 4 whole wm

Necklines Part Three

The Triangles and the Squares

Lately I find myself warring between writing well and writing quickly.  I want to share the information I have as quickly as possible, but my life is incredibly full and full of interruptions. Even though I used to be much faster, I am pretty slow at writing now.  As a mother of 5, a Gran of 1, and a constant host to many other children, I feel like my ADD only gets worse over the years.  Five solid minutes to myself, even when I’m in the loo, is rare.  Keeping one strand of thought in my head at a time is nearly impossible.

Long explanation to say please forgive me if my writing is lack luster and if there are frequent spelling errors, grammar errors, and the even more embarrassing malaprops.  I would not mind a correction now and then being sent my way. 😉

On to the goodies. . .

The basic information on measuring for and patterning necklines is in my last post:

https://maniacalmedievalist.wordpress.com/2016/03/23/not-your-normal-neckline-part-2/

This post is mostly about tweaking that method to make the not so round necklines.

Basic Triangular Neckline

The internal area of a triangle is less than a circular shape of a similar size.  Let’s start with our basic perpendicular lines with points A, B and C on it (see the previous blog post).

The opening for the back of the neck will be the same rounded shape. Go ahead and connect point to the point on the horizontal line in a very rounded way.  I often use a French curve to get that nice round shape, but that’s not necessary.

To give the hole more space for the head opening, add an inch or so under point C .  In this example, we are making a rounded triangular opening.  I usually start by making a straight line connecting the point below C to the point on the horizontal line. You can see a bit of the erased line on the image below.

triangle 1 wm

Like we did with the rounded necklines, fold the paper in half along the vertical line and cut out both sides of the hole at once.

To get a hole that has a bit more of a straight edge, do not round out the line as much or at all.

triangle 2 wm

Triangular Neckline with Center Slit

Again, start with your perpendicular lines and points A, B and C.  

triangle 3 wm

Below point C, add an inch or so.  Connect point C with the horizontal line. With a slightly slanting line, connect point C with the point below it.

Triangular Neck-hole Facing

To make a neck facing or a contrasting colored neckline, start with any of the principles above.  Outside of each point, add the desired width of the facing plus a hem allowance.  Connect all of the points together in the same basic shape as the original hole.

triangle 4 wm

Triangular Hole with Different Shaped Facing

Some period neckline designs combine different hole shapes  and  facing shapes.  It produces a really cool effect.  An example of a triangular hole with a square collar is below.  I like to keep the back edge of the hole round. Whether or not your follow that curve with the facing is up to you.

triangle 5 wm

Basic Square Neckline

The square neckline is constructed more like the round neckline than the triangular.  You have points A, B and C on your lines.  Round the back of the hole.  From the side point, go straight down until you are even with point B.  From the end of that line, make a rounded or straight connecting line to point C .

That’s it.  Fold the paper in half and cut it out.

square 1 wm

square 3 wm

Square Neckline Facing

Same principle as with the round facing, mark the desired width plus seam allowance outside of the basic points and then connect them.

square 2 wm

square 4 wm


“Batman” Shaped Neckline

I love this neckline shape and it is totally period!  I lump it in the same category as the squares since it is made with a similar method.

From the point on the horizontal line, go straight down until the line is even with or a little below point B.  From the end of that line, make a curved line joining it with point C .

square 5 wm

Take the same principle to make a square opening with a center slit.

square 7 wm

Tips and Tricks

Tip 3: Stay Stitching

Stay stitching is a basic straight stitch made along the edge of the fabric, usually a curved edge. This prevents the fabric from stretching out and distorting.

If you are not using a facing or contrasting colored neckline, make a stay stitch around the opening of your neckline.  Like in tip 2 (see previous post), you can do this before you cut out the neck-hole.

Tip 4: Embroidery First

If you are going to embroider the neckline or contrasting neck facing, do this before you put the neckline together.  A stay stitch along the edge of the contrasting fabric is also a good idea.

Next up in the neckline series . . . instructions and pictures of actually making a neckline.  This may be a while since I have to do it and take pictures before I post.

Until next time – go make some garb!!
Not Your Normal Neckline – Part 1

A survey of different styles of necklines from period sources.

Take a look around at the clothing most medieval re-creationists wear. The vast majority have the same neck-hole – round or round with a front slit. There are variations, but mainly in the decorative contrast fabric.

From what we know of period clothing, from both extant pieces and art, necklines were more varied than what we see. My purpose here is more to inspire than to educate. All of the necklines that I sketched are from period art sources, mostly manuscripts but also art such as monuments or paintings.

The necklines are divided into three categories based on the shape of the opening: round, triangular and square. I did not find many necklines that went outside of these categories, but within each category there is a-lot of diversity.

Round Necklines

Round wm.jpg

Triangular Necklines

Triangles wm.jpg

Square Necklines

square wm.jpg

Pattern Your Own Simple Coif / Unpadded Arming Cap

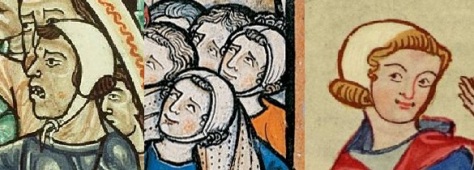
Period Coifs / Caps
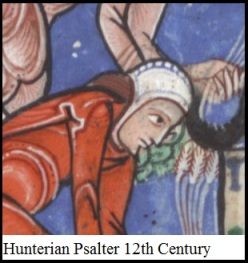
Left: 12th Century
Middle: 13th Century
Right: 14th Century

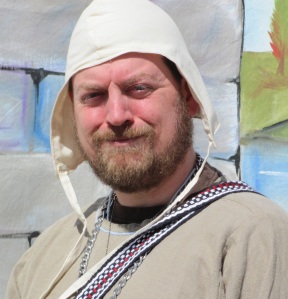
The plain coif/cap is probably the most versatile piece of garb in the Middle Ages. It was worn for centuries and  changed very little.  It was worn by both sexes. It’s comfortable, practical and easy to make.

Called many different thing, from coif, cap, or hood.  In other languages: koaff, bundhaube, kveiv, kveif, haube, coiffe, huva or kapper. It is essentially a close fitting hat, fastened under the chin using straps.

For events like Gulf Wars, Pennsic or Estrella, having several caps is a must. Keeps the sun off your head during the day and your head warm at night.

If you have kids wear medieval clothing, nothing looks cuter than a child running around wearing a plain linen or cotton coif! And since their hair is often thin or sparse, it keeps their head from burning.

Fabric:

  • Linen: if used under a helm, linen is a must. It wicks the sweat away from the head and gives a cooling effect.
  • Wool: if used to keep your head warm, a lightweight wool is nice. If it’s too itchy, line it with linen.
  • Cotton: a non-period less-costly alternative. Light muslin makes a nice summer coif to keep the head cooler.

 Colors

  • White-ish

 2 Piece Style:

  • Good from early period all the way through the 14th and possibly the 15th century.
  • Even women wore this style in the later centuries.
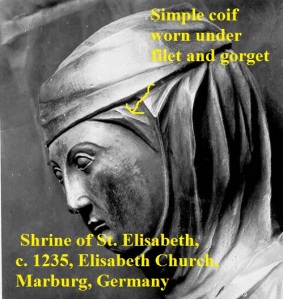
    • They used the simple coif under their veils, filets, wimples or gorgets to give something solid that those pieces could be pinned to.
  • This style was used as a padded arming cap as well.

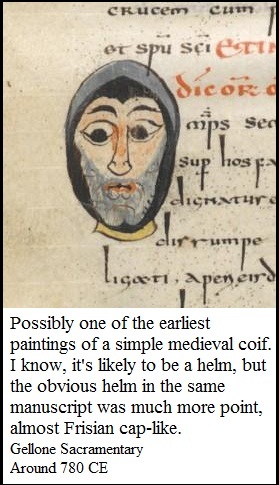
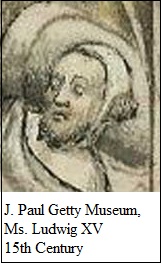
Simple Caps / Coifs in Period

8th Century

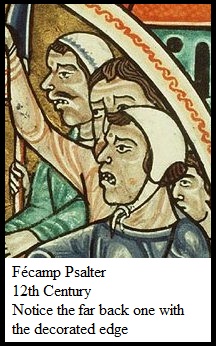
12th Century
Fecamp Psalter

12th Century
Hunterian Psalter

13th Century

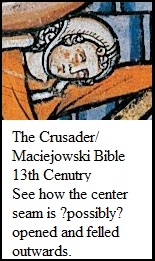
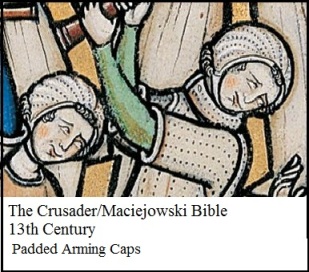
Padded Arming Cap / Coif
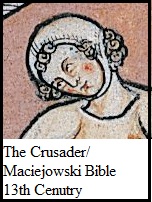
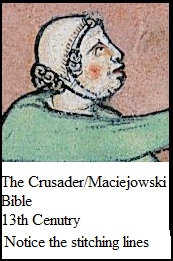
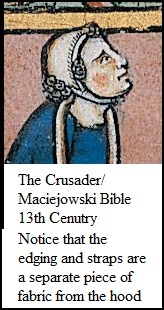
13th Century
Morgan / Crusader / Maciejowski Bible

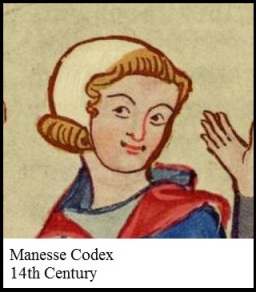
14th Century
Manesse Codex

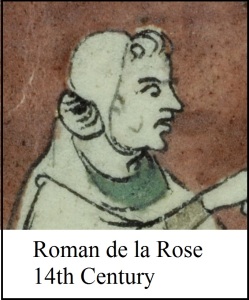
14th Century
Roman de la Rose

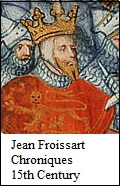
15th Century

15th Century
Jean Froissart Chronicles

Even women wore simple coifs
13th Century Germany
Shrine of St. Elizabeth

Measuring

I have a hypothesis: all garb patterns can be reduced to mathematical equations. Perhaps it’s true of all clothing in general, but I’m only working on garb.

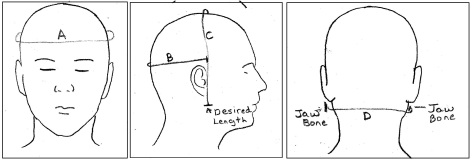
click to enlarge

A = length around your crown

B = Measure around the larger part of the back of your head from the front of one ear to the front of the other ear

C = Measure from the desired length of your cap on one side, around the top of your head to the desired length on the other side.

D = Measure around the base of your head from jawbone to jawbone

A  = __________

B = __________

C = __________

D = __________

The Math

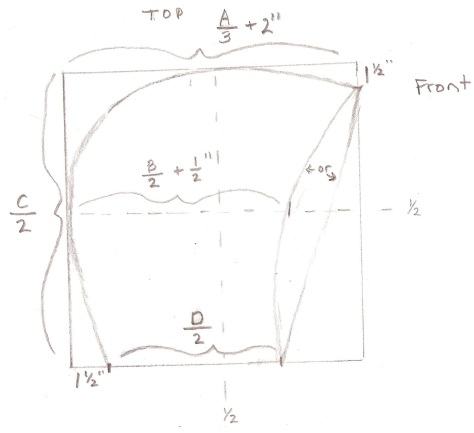
  1. Width of the pattern: Divide A by 3 {A/3} than add
    1. 2” for an average head
    2. 3” for a larger head
    3. 1” for a child’s head
    4. _________________
  1. Length of the pattern: Divide C by 2 {C/2}

_________________

  1. Draw a rectangle with the above dimensions
  2. Write “Top” and “Front” in the appropriate parts of your pattern
  3. Mark or fold the pattern in half in both directions, just for reference
  4. On the bottom edge:
    1. From the back, mark 1 ½ “ (1” for a child’s head)
    2. Divide D by 2 {D/2}
    3. _______________
    4. From the 1 ½” mark, go towards the front D/2.
    5. This is the bottom edge of your coif.
  5. On the center-line(halfway between top and bottom):
    1. Divide B by 2 {B/2}
    2. Add 1/2”
    3. ______________
    4. From the back side, on this centerline going towards the front, mark the above measurement
  6. On the front top edge
    1. Mark 1 ½” down from the top (1” for children)
    2. We’ll use this mark later

Click to enlarge

Connecting the Dots

  1. Let’s start at the bottom back.
    1. From your 1 ½” mark in (or 1” for a child’s cap)
    2. Curve a line up towards the back center-back
    3. Have the line meet the back edge about an 1 to 1 ½” below the center line
    4. Run the line along the back-edge through the center-back line and above it another 1 to 1 ½”
  2. Curve the line up towards the center top line
    1. Similar to the center-back, have the line meet the edge about ½ to 1” before the centerline and run along it for ½” to 1” after before curving down.
    2. Curve the line towards the 1 ½” mark (1” mark for children) on the front edge
  3. Front edge
    1. Two choices
      1. For a straight front: draw a straight line connecting the mark on the front top  edge to the D/2 mark on the bottom edge
      2. For a curved front: curve the line down towards the D/2 mark, intersecting with the B/2+1/2” mark on the centerline.

ADD YOUR SEAM ALLOWANCE when cutting  – ¼” to ¾” depending on your sewing style

Unless, you are making a 13th century styled cap with separate “hem tape.”

 Styles

Tight Fitting Cap

The above pattern will produce a fairly snug cap for you

Looser fitting Cap

To get a cap that is a bit looser, add an extra ¼” to 1” when adding the seam allowance.

Padded Arming Cap

This pattern can be used to make a padded cap as seen in the Crusader Bible.

  1. Add an extra ¾” to 1” to the pattern.
  2. Cut 4, rather than 2, pieces
  3. Sew the center and front together, but leave the bottom back open
  4. Make the quilting lines (the dashed lines you see in the picture)
  5. Stuff the hat with fluffed out cotton balls or scraps of linen. Use a wooden dowel or rod to pack the material into the grooves.
  6. Squish it around with your fingers so that the padding is mostly even.
  7. Hem up bottom back.

Making the straps

We’re making simple straps. You can customize them, but we’ll do simple first.

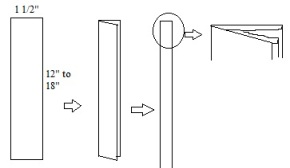
  1. Cut out two long rectangles of fabric
    1. About 1” to 1 ½” wide
    2. 12” to 18” long
  2. Fold them in half length-ways and iron.
  3. Fold each side in half length-ways and iron again.
  4. On one end of each strap, fold the rough end into the lengthwise fold to hem that side.
  5. Sew the edges

Sewing

  1. Cut 2 of your coif pattern
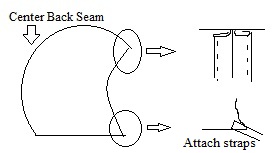
  2. Sew up the center seam.
  3. Tuck under and iron the seam flat with each side folded over to its own side. Sew along edges to tack the seam down
  4. Hem the front and bottom by folding under the edges, ironing them flat and sewing them.
  5. Attach the straps to the front bottom corner

You are unless you want to add decorative elements if you like. Or leave it plain.

Enjoy your cap!!

On Yer Heade Part I

Period Head Coverings OR, alternately, What Hat Goes with My Outfit?

Part I: Early Period to 12th Century

I’m not a “Cover your head!” Nazi, but I do think that it adds to the Medieval-esque feel of an event when more people wear the correct hat.

For most of the SCA period, head coverings (head-ware) was not considered optional by either sex. It’s called interchangeably head-ware, headgear, head covering or hats.  Unlike today where we wear hats for special occasions or to keep the sun off of our head, head coverings were a part of everyday life, especially for women.  You would not step out of your front door without wearing proper headgear.

There was a small time (mid-12th century) when it was acceptable for women not to cover their heads, but for the most part through the ages all older or married women covered their heads.

What was the purpose?

Modesty: There are even a few cultures today which require their people to cover their heads outside of their home.

Lack of hygiene: Their hair was as hard to tame as ours can be. Imagine trying to fix your hair if it is really long and hasn’t been washed for weeks or months. Sticking it all in a hat seems sensible.

Identification: Headwear gave clues to class and occupation. Different classes of people wore different kinds of head coverings. In later period, sumptuary laws were made forbidding lower classes to wear the same head covering that the aristocracy wore.

When in doubt

  • For male, wear a coif. If early period, women can too.
  • For female, wear a veil

Early Period

For both Sexes:

  • Coif
    •  
    • A rectangle of cloth, folded in half. Point in back can be curved or left pointy.
    • Ties partly up front sided.
    • Not terribly sure, but it is guessed that the color was white or unbleached linen.

For Women

  • Headrail
    • A headrail is pretty much a long rectangle of cloth wrapped around your head.
    • From looking at period sources, it can be a variety of colors ranging from bleached linen to red to blue.
    • It’s very similar to the modern hijab. In fact, the best directions I could find on wearing one is for a hijab: http://thehijabshop.com/information/how_to_wear.php
    • The Encomium Emmae Reginae, 1041-2.
    • Cotton Claudius B IV, folio 10, from the Old English Illustrated Hexateuch in the British Library, 11th century.

For Men

  • Birka Cap
    • Based on a woolen cap found at the Birka site

12th Century

 For Women

There was a short time period where women had the option of not wearing a head covering.  Starting around 1125, some women began to appear in public with their head uncovered. Their hair, however was not loose, but parted down middle and plaited (braided) in various ways. By the late 12th century, women were back to covering their heads.

For Men

  • Coifs
    • The coif is still around, but it is now more form fitting. It’s also higher in the back than it is at the ear area. Straps can still be thin or wider.
    • Unknown Miniaturist, French around 1180. Fécamp
      Harvesting and_Pressing of the Grapes

  • Closed Hoods
    • Simple hoods began showing up at this time. Closed fron at the chest (no buttons), so it needed to be loose enough to slip over the head. The hood, at this time, covered the shoulders and had no tail.
    • The colors could be about anything, although red was common. You also see decorations the hoods – this one has a contrasting front and bottom edge.
    • Unknown Miniaturist, French (active c. 1180 at Fécamp)
      Feeeding the Pigs with Acorns

  • Combination of hood and coif
    • The coif and the hood could be worn together. It’s not definite if a coif was always worn under the hood, but combining them is not uncommon.
    • Phrygian Cap
        Yes, the Smurf hat is still around

Tomb plaque of Geoffrey Plantagenet (1113-51) from the Cathedral of St. Julien, Le Mans, c.1151-55.

  • Basic Birka-like Cap
    • The basic cap is also still here. It’s a bit shorter and has a more defined band around the edge.
    • Hunterian Psalter
      England: c. 1170

To Be Continued

The pencil drawings were found at: http://sites.tufts.edu/putajewelonit/2011/09/21/glossary-of-english-hairstyles-headdress/

I apologize for using pictures without giving credit. These come from a class handout that I taught on period hear-ware, and I did not document my pictures at the time. If you recognize any, please let me know and I’ll give credit to the artist.

Other sources: